

BMW 3-Series and 4-Series Forum (F30 / F32) | F30POST
>
DIY: Installing a Dash Cam w/Backup Battery Pack The OEM Way

| 01-21-2019, 08:07 AM | #1 |
|
///M SubDriver

1837
Rep 2,783
Posts
Drives: 2017 M3, 2020 X7 40i
Join Date: Jul 2016
Location: DMV
|
DIY: Installing a Dash Cam w/Backup Battery Pack The OEM Way
Well almost OEM anyway...
 . The inspiration for installing my dash cam this way came from the OEM installation instructions for the BMW Advanced Car Eye v2. Given a choice, my OCD prefers to install stuff in the car as close to OEM as possible, especially the electrical connections and routing the wiring. This post will not document the entire dash cam install as that has been posted quite a few times on the BMW forums. But it will give you some insight into how to to do it "close" to the OEM way. I say close since the OEM dash cam has some different features from aftermarket dash cams - most notably the OEM dash cam does not use a battery backup, which I used. Also, the OEM dash cam draws power from the FEM and only runs the video cable for the rear camera along the floor on the passenger side. I ran the power wires to the trunk, where the battery backup is installed (and would have run the power wires there even without using a battery backup as I prefer to use the fuse box as the source of power, not the FEM). I will include the OEM dash cam install directions as a reference. . The inspiration for installing my dash cam this way came from the OEM installation instructions for the BMW Advanced Car Eye v2. Given a choice, my OCD prefers to install stuff in the car as close to OEM as possible, especially the electrical connections and routing the wiring. This post will not document the entire dash cam install as that has been posted quite a few times on the BMW forums. But it will give you some insight into how to to do it "close" to the OEM way. I say close since the OEM dash cam has some different features from aftermarket dash cams - most notably the OEM dash cam does not use a battery backup, which I used. Also, the OEM dash cam draws power from the FEM and only runs the video cable for the rear camera along the floor on the passenger side. I ran the power wires to the trunk, where the battery backup is installed (and would have run the power wires there even without using a battery backup as I prefer to use the fuse box as the source of power, not the FEM). I will include the OEM dash cam install directions as a reference.One of the resources that made this install easier is access to the factory repair instructions. Removing interior trim panels can be a bit daunting - a wrong "tug" at the wrong place can equal broken clips, or even worse, broken trim pieces. I pulled these procedures from newtis.info and made some PDFs for the applicable ones. I will also include those PDFs for the trim panel pieces I removed below. Lastly, I wired my dash cam to one of the unused fuse locations in the fuse box in the trunk. Instead of using the add-a-fuse method, I used an OEM terminal plug that I added to the fuse box. I won't go into the details of that part in this thread, but I made another thread about how to do it here: https://f30.bimmerpost.com/forums/sh....php?t=1575292 For my install, I used a BlackVue 590W-2CH dash cam with the BlackVue B-124 battery pack. However, what I did in this install can be applied to just about any dash cam/battery pack combo. The hookup between the dash cam and battery pack may be slightly different depending on the brands you choose to install. Finally, I have a 3-series sedan (an F80 specifically) so the trim removal and wire routing may be slightly different in the rear of a coupe. However, certain things like removing the rear seat pieces and trim pieces should be almost identical. Prep Work: The wiring path I followed is the OEM path from the rearview mirror, down the A-pillar on the passenger side, and following the main wiring harness along the floor to the fuse box in the trunk (for power) and the rear window (for the rear camera). In the following pics, the applicable trim panels have been removed. A-pillar. You can see the airbag and the factory wrapped harness.  Footwell, where the Front Electronics Module (FEM) is located. You will have to remove a small part of the rubber door seal to get this off. You also need to remove the panel under the glove box before you can remove this panel (not seen).  Front passenger door sill trim.  B-pillar lower trim panel. This actually comes off pretty easy, just requires some force to disconnect the clips. It also requires pulling off a small section of the rubber door seal.  Rear passenger door sill trim. You will need to remove the rear seat bottom before removing this trim piece (already removed). The only PITA part about removing the rear seat bottom is getting the seatbelt clips to pass through - just takes some patience.  Side backrest cushion, the part that does not fold down. You also see the main wiring harness here. The arrows point to the "black box" that I refer to below. I routed the BlackVue wires inside this, right next to the main wiring harness.  C-pillar trim piece. I actually did not take a picture before I ran the rear camera cable so this is the final install. Can you see the rear camera cable  ? ?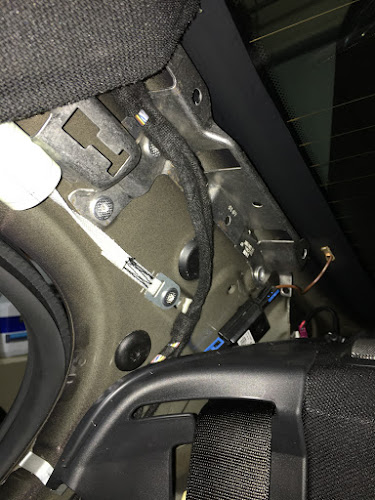 For almost all of the cable used for the install, I wrapped it with Tesa Tape (part #51608). This is that cloth tape that most OEM's, including BMW, use when running cables inside the cabin. The OEMs do this for two basic reasons: abrasion protection and noise/rattles. This chassis already has enough issues with rattles so I didn't want to potentially add any more. Also, I wanted the install to "blend" in with the OEM wiring. Below is a pic of the main dash cam harness (power & rear camera cable) all wrapped in Tesa tape. I purchased the tape on eBay: $10 for three rolls w/25m of tape on each roll. For this install I used one roll.  Routing the wires: This part is pretty straight forward now that all of the trim panels have been removed. I always tried to use factory mounting points to tie down the wires. I also only used zip ties where necessary, otherwise the Tesa tape was used. I did not tie down the wires running along the floor board as being between the carpet and the floor of the car is enough to keep it from moving around. Below are a few pics of the new, Tesa tape wrapped wires, being routed and tied down. See if you can see where the OEM stuff ends the aftermarket stuff begins  . .First, starting at the front camera and moving under the headliner (I used a BlendMount to mount my dash cam).  A-pillar. This is one of the few places I used zip ties. Incidentally, the OEM dash cam instructions also call for zip ties here as well.  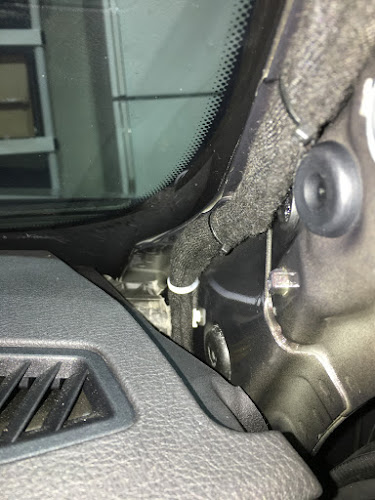 Going down into the footwell. It is a bit hard to see, but there is a white zip tie where I tied down the dash cam wires before it went down past the FEM.  Down behind the FEM, going to the floor and under the carpet to the rear of the car. You can also see where I used some Tesa tape to tie down the wires. Tesa tape does a good job sticking to itself and the OEM wiring is tied down this way in several locations as well.  Here are the pics of the main wiring harness location in the rear of the car, behind the rear seat back. It is actually housed in a plastic "box" which is seen open here (and closed in the pic of the main wiring harness above). I ran the cables through this. Also in the second pic, you can see where I split the video cable for the rear cam and the power wires (and also closed the black box housing for the main harness). Incidentally, if you were wondering what all of those twisted pair wires are, they are the CAN bus lines going between the the FEM and Rear Electronics Module (REM) - may come in handy for other projects  . .  Here is the power wire going towards the fuse box. The white plastic channel you see is where I was able to hold down the wires from moving, both at the top and at the bottom (you can just barely see it at this angle). This was already here, unused by any factory wiring, and perfect for routing wires into the trunk area - which is what I speculate these guide pieces were designed to do.  Here is the pic of the rear camera wire going up the C-pillar, attached to some existing wiring. The yellow circle is one of the OEM clips, which presses into a hole in the frame/body. The OEM attaches the harness to these white clips with Tesa tape, which is what I did here with the camera wire. You need to be carful when prying these out of the frame/body as they can break - just takes some patience.  And then finally coming out to the rear camera.  There is really not a whole lot to see in the trunk area. I finished routing the power wires for the dash cam under the trunk lining to where I installed the BlackVue B-124 backup battery. I then routed the 12V power wire from the B-124 to the fuse box, connecting it to fuse 145 using the OEM method I mentioned above. This particular fuse spot already had a 15 amp fuse there, which is what I was going to use for the B-124 anyway (it pulls a max of 13.5 amps according to the specs). I routed the ground wire for the B-124 to the battery compartment. Ground wire going to the battery compartment, grounded at a factory ground location.  Final setup with the B-124 installed and wired up. You can see the Tesa tape wrapped 12V wire coming from the fuse box towards the B-124 (going under the trunk lining). As I mentioned above, I used an OEM fuse terminal plug and tied into fuse 145 from the bottom of the fuse box - no add-a-fuse tap was used (fuse 145 is not used by any factory components and is tied to ignition). I originally wanted to find a good spot to hide the B-124, like possibly where the ASD module is located (rear driver side corner of trunk). But I am happy where it is for now. As long as the velcro that it came with holds it in place, I will most likely keep it there. 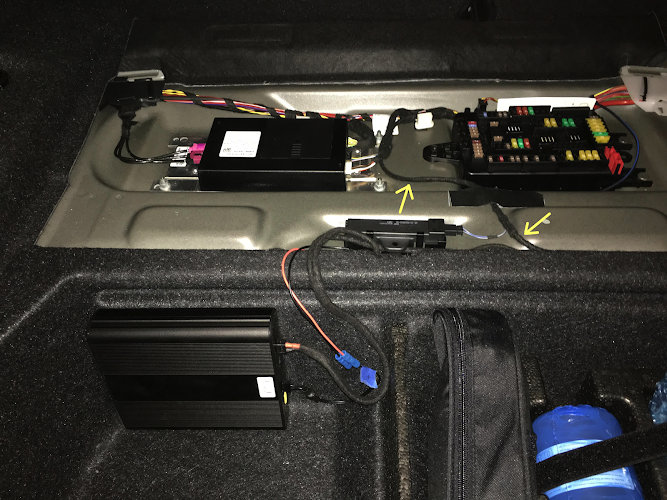 A few other quick notes... 1. I purchased the dash cam hardwiring cable made by BlackVue (part #CH-2P) instead of just cutting the cigarette lighter cable that came with it. I then spliced it with the plug that came with the B-124 so that I could plug the dash cam into the B-124 (the B-124 only comes with a cigarette lighter socket to plug in the dash cam). Note that if you do this, the cigarette lighter cable and the hardwire cable require a 2 amp fuse to protect the dash cam. This 2 amp fuse is installed inside the cigarette lighter plug. I still retained this fuse, but you can't see the fuse holder after I installed everything in my car (it is under the trunk lining). It was a simple in-line fuse holder I purchased off eBay that uses blade stye fuses (like the OEM fuses used in the fuse box). 2. I needed to extend the BlackVue hardwiring cable an additional six feet or so to have enough slack to get to where I mounted the B-124. 3. How long did this take me? I didn't really keep exact times as I did it over a weekend (not including the "fuse box reconn" I did which I posted in another thread). But if I went from start to finish I could have probably finished it in 4-5 hrs, which includes taking my time with the trim pieces. Enjoy!
__________________
///M3 COMPETITION 6MT - 2017 F80 Smoked Topaz Metallic
BM3 / MP-HAS / GC Camber Plates / Carbonstructure Interior X7 XDrive 40i ///M-SPORT - 2020 G07 Arctic Grey Metallic  X3 XDrive 30i - 2019 G01 Mineral White (wife's) / 128i 6MT - 2009 E82 Jet Black (son's) Last edited by jmciver; 01-22-2019 at 11:11 AM.. |
| 01-22-2019, 10:54 AM | #2 |
|
Major
 
705
Rep 1,141
Posts |
Another excellent write up
 Do you have any more pictures of the Blendmount ? I wonder if it would work in the UK on a RHD car. I'm guessing the only possible issue would be that the mirror clamp may stop the mirror angling round to be visible from the RHD drivers seat. I don't like to ask you to move your mirror (that a whole different section of OCD), but can you adjust the mirror correctly if you're sitting in your passenger seat ? It looks a much nicer mounting bracket than the Blackvue version, and I hate the sticky pad on the windscreen. My only other problem is shipping one from the US. |
|
Appreciate
0
|
| 01-22-2019, 11:07 AM | #3 | |
|
///M SubDriver
1837
Rep 2,783
Posts
Drives: 2017 M3, 2020 X7 40i
Join Date: Jul 2016
Location: DMV
|
Quote:
Maybe some others from your side of the pond will chime in as I would be shocked that this question has not been asked about the BlendMount as it has been in production for a while.
__________________
///M3 COMPETITION 6MT - 2017 F80 Smoked Topaz Metallic
BM3 / MP-HAS / GC Camber Plates / Carbonstructure Interior X7 XDrive 40i ///M-SPORT - 2020 G07 Arctic Grey Metallic X3 XDrive 30i - 2019 G01 Mineral White (wife's) / 128i 6MT - 2009 E82 Jet Black (son's) |
|
|
Appreciate
0
|
| 01-23-2019, 07:03 AM | #4 | |
|
Major
705
Rep 1,141
Posts |
Quote:
I did ask Blendmount, but they only do LHD versions. Looking at their website, it looks like the part number I need is VBB-2017. That said, the design appears to have changed. Their website shows the old style (like yours), but I can find pictures elsewhere that show the newer type. I actually prefer the old type, as it looks a little more discreet. Do you know the part number of your mount, and did you buy it recently? If so, where? I'll try and get the old style if I can find a seller that has stock. Failing that, I'll have to try the new version. Can't find anyone mention of it on UK sites at all. |
|
|
Appreciate
0
|
| 01-23-2019, 10:30 AM | #5 | |
|
///M SubDriver
1837
Rep 2,783
Posts
Drives: 2017 M3, 2020 X7 40i
Join Date: Jul 2016
Location: DMV
|
Quote:
Here is the thread from 2017 I was referring to which I believe has the older design: https://f80.bimmerpost.com/forums/sh....php?t=1423087 I can take a closer look at my mount, but as I mentioned earlier, it appears that the horizontal swivel should be able to swivel 180 degrees, which would put the attachment bracket on the left side of the mirror, vice the right. This would in turn flip the BlackVue camera 180 degrees also, making the picture upside down with the BlackVue installed in the mount. However, the BlackVue software allows you to "flip" the image of both the front and rear camera to allow for different installation configurations. In fact, I had to flip the camera orientation for the rear camera based on how I installed my rear camera. I also believe that the software "flip" feature is relatively new in the BlackVue software, which could possibly explain why BlendMount states thier design will only work with LHD vehicles.
__________________
///M3 COMPETITION 6MT - 2017 F80 Smoked Topaz Metallic
BM3 / MP-HAS / GC Camber Plates / Carbonstructure Interior X7 XDrive 40i ///M-SPORT - 2020 G07 Arctic Grey Metallic X3 XDrive 30i - 2019 G01 Mineral White (wife's) / 128i 6MT - 2009 E82 Jet Black (son's) |
|
|
Appreciate
0
|
| 01-23-2019, 01:27 PM | #6 | |
|
Major
705
Rep 1,141
Posts |
Quote:
I'll get one ordered and see what needs changing to suit RHD. I can machine some replacement links if needed. I don't actually want to flip the camera. I want it to sit exactly how it does in your car, but just have the mirror clamp the other side. I should be able to use the existing mirror clamp, and make a replacement middle link to get everything sitting correctly. I'm not sure my OCD could cope with the Blackvue branding being upside down  |
|
|
Appreciate
0
|
| 01-23-2019, 01:46 PM | #7 | |
|
///M SubDriver
1837
Rep 2,783
Posts
Drives: 2017 M3, 2020 X7 40i
Join Date: Jul 2016
Location: DMV
|
Quote:
__________________
///M3 COMPETITION 6MT - 2017 F80 Smoked Topaz Metallic
BM3 / MP-HAS / GC Camber Plates / Carbonstructure Interior X7 XDrive 40i ///M-SPORT - 2020 G07 Arctic Grey Metallic X3 XDrive 30i - 2019 G01 Mineral White (wife's) / 128i 6MT - 2009 E82 Jet Black (son's) |
|
|
Appreciate
0
|
| 02-09-2019, 10:45 PM | #8 |
|
///M SubDriver
1837
Rep 2,783
Posts
Drives: 2017 M3, 2020 X7 40i
Join Date: Jul 2016
Location: DMV
|
Update... I figured out a way to move the B-124 to the area above the HK Amp on the driver side and maintain an OEM look in the trunk. This is where I originally wanted to put it...
So my OCD did not really like the original spot I placed the B-124 as I wanted to keep that as a storage area, not an area for permanently installed electronic components. Then I recently stumbled across a thread about a car stereo upgrade that used the trunk liner for F30s that have the OEM DVD changer option. I now had my OEM install solution. Here is a pic with the original driver side trunk liner removed. The original cables had enough length to get to the new spot. I just needed to re-route the ground wire from the passenger side to the driver side of the trunk. The arrows show the OEM ground block I used and how I routed the ground wire, following OEM wire routing. Removing the trunk liner was pretty easy - three plastic rivets and a tie-down loop hold it in place. I also needed to remove the driver side rear seat back cushion as well to get to one of the plastic rivets. You also need to remove the plastic trim piece that goes around the trunk latch (held in place by 4 plastic rivets). The next few pics show the B-124 in its new home. There is actually a lot of room when using the new trunk liner. While I don't intend to remove the B-124 from my car, I used velcro to hold it down for easier removal and installation.   And then the final pic of the new trunk liner installed and closed up. 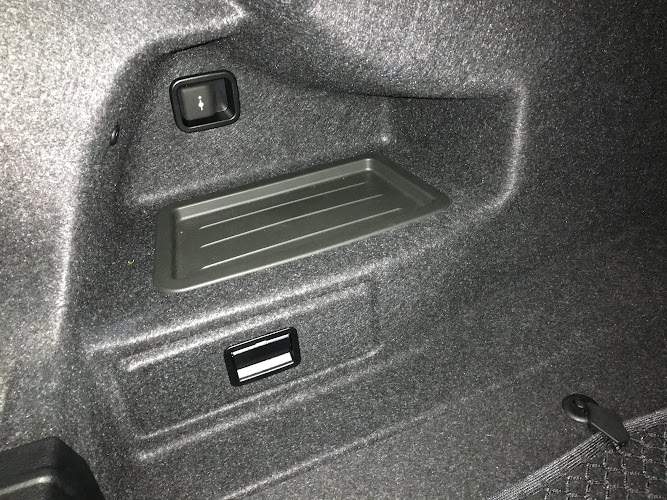 For those curious, the p/n for the DVD changer trunk liner is 51-48-7-246-299. The only minor PITA with the install was that I needed to cut out the hole for the 12 volt socket in the new trunk liner. I used my original trunk liner as a template and then cut out the hole with a sharp utility knife. Overall I am pleased with how it turned out. While not the cheapest or easiest route for a dash cam and battery backup install, it wasn't that bad either.
__________________
///M3 COMPETITION 6MT - 2017 F80 Smoked Topaz Metallic
BM3 / MP-HAS / GC Camber Plates / Carbonstructure Interior X7 XDrive 40i ///M-SPORT - 2020 G07 Arctic Grey Metallic X3 XDrive 30i - 2019 G01 Mineral White (wife's) / 128i 6MT - 2009 E82 Jet Black (son's) |
|
Appreciate
0
|
| 02-10-2019, 04:04 PM | #9 | |
|
///M SubDriver
1837
Rep 2,783
Posts
Drives: 2017 M3, 2020 X7 40i
Join Date: Jul 2016
Location: DMV
|
Quote:
 
__________________
///M3 COMPETITION 6MT - 2017 F80 Smoked Topaz Metallic
BM3 / MP-HAS / GC Camber Plates / Carbonstructure Interior X7 XDrive 40i ///M-SPORT - 2020 G07 Arctic Grey Metallic X3 XDrive 30i - 2019 G01 Mineral White (wife's) / 128i 6MT - 2009 E82 Jet Black (son's) |
|
|
Appreciate
0
|
| 02-10-2019, 05:12 PM | #10 |
|
Major
705
Rep 1,141
Posts |
Thanks for the pics
I've already ordered the mount, or more accurately a friend in the US ordered it and is sending it over to the UK. Unfortunately, he lives in Chicago and the recent cold weather has delayed things. Looks like I'll have to make a RHD version of that section of the mount to get it to fit. Thankfully, I've got access to all the equipment needed at work. |
|
Appreciate
0
|
| 03-10-2019, 09:45 AM | #11 |
|
Major
705
Rep 1,141
Posts |
Just to update this...
My Blendmount arrived, so I took some measurements form the original, and modelled the new RHD middle section in CAD (Solidworks). I then found a suitable piece of aluminium in the workshop, and got milling.      Just need to get it anodised black, and it's ready to go in the car. I'm happy to provide the CAD files for the RHD part if anyone needs them. This is designed to work with the BBV-2017 Blendmount, but may work with others. |
|
Appreciate
0
|
| 03-10-2019, 10:06 AM | #12 |
|
///M SubDriver
1837
Rep 2,783
Posts
Drives: 2017 M3, 2020 X7 40i
Join Date: Jul 2016
Location: DMV
|
Impressive work! Makes me wonder why Blendmount didn't offer this variant to begin with as I would think there is a decent market for this product for RHD drive cars.
__________________
///M3 COMPETITION 6MT - 2017 F80 Smoked Topaz Metallic
BM3 / MP-HAS / GC Camber Plates / Carbonstructure Interior X7 XDrive 40i ///M-SPORT - 2020 G07 Arctic Grey Metallic X3 XDrive 30i - 2019 G01 Mineral White (wife's) / 128i 6MT - 2009 E82 Jet Black (son's) |
|
Appreciate
0
|
| 03-10-2019, 10:25 AM | #14 | |
|
Major
705
Rep 1,141
Posts |
Quote:
I wonder how many orders they ship internationally. |
|
|
Appreciate
0
|
| 08-04-2019, 02:32 AM | #16 | |
|
New Member

7
Rep 19
Posts |
Quote:
Been looking all over the web for a RHD Blendmount and finally stumbled across this post! As you've mentioned being willing to share the CAD file I was hoping I could request a copy please I don't have CNC equipment myself but will be able to ask friends for assistance or direction to a suitable local company (I'm in Melbourne, Australia) who deals with small CNC or 3D printing orders.If you would be so kind as to send me a message or leave a reply on here if you are happy to pass the drawing on that would be absolutely fantastic! Thanks a bunch! *EDIT* Just realised my profile still lists me as owning an M140i. That car was tragically written off by a moron on his phone last year, and I have been lucky enough to upgrade to an F82 M4 in the meantime hence the need for an F3x/F8x compatible Blendmount. Last edited by d0ctorj3kyll; 08-04-2019 at 02:34 AM.. Reason: Providing extra information |
|
|
Appreciate
0
|
| 08-04-2019, 05:37 AM | #17 | |
|
Major
705
Rep 1,141
Posts |
Quote:
|
|
|
Appreciate
0
|
Post Reply |
| Bookmarks |
|
|


