
 |
|
 |

|
|
|
| 06-25-2016, 01:06 PM | #1 |
|
997.1TT

1001
Rep 1,672
Posts |
DIY: Carbon Fiber Repair ESS VT1 Manifold
I recently purchased an ESS VT1-550 kit from a friend locally. It has the upgraded carbon fiber manifold and textured black supercharger ($1500 and $300 upgrades, respectively). Considering the upgrades and the fact there are less than 5000 miles on the kit, I got a steal at $4000.
The only bad thing is, the beautiful carbon fiber finish was cracked in shipping when the previous owner bought it, and he did not open the box in time due to being away when it came, so there was nothing he could do as far as filing a claim. I knew the damage existed, but didn't realize how severe it was until I picked the kit up. This is probably a huge part of the reason I got such a good deal on the kit (the other being that I got the "friend" price). I had originally intended to have the manifold painted yellow to match my Stoptechs, so I wasn't concerned with the cracks, and had intended to run the kit as is (just like the previous owner did) and get it refinished at a later date. Needless to say, I am in love with the carbon fiber finish, and with this being a $1500 option with this kit, I hated the idea of painting it. So I began to wonder, is there some way that I can repair the carbon fiber, or at least make the cracks less noticeable and keep them from spreading? DISCLAIMER: I am not a professional. This was my first attempt at anything like this, so my technique may not be the "correct" way, so take this thread for what it is. I have to admit I didn't know what to think going into this, but I decided to give it a shot because as it was, the manifold had to be painted anyways, so I figured any damage I did couldn't make my situation any worse than it already was. In the end, I am very pleased with the results, and a bit surprised it turned out so well. I also wanted to add that this is more of a brief explanation of the steps I took, with a look at the before pictures, the end results, and a few photos of the steps in-between rather than a step by step DIY guide. Total, I would estimate about 25 hours went into this, and the steps I took may not work for every scenario or every person. You may need less sanding or polishing, or you may need to add steps here and there depending on what you are working with. For this repair, I used the following: 1. Sandpaper (150 grit, 320 grit, 400 grit, 800 grit, 1200 grit) 2. Meguiars M105 Ultra Cut Compound 3. Meguiar's M205 Ultra Finishing Polish 4. Meguiar's Gold Class Carnauba Car Wax 5. Porter Cable 7424 Dual Action Polisher 6. Chemical Guys Yellow, Orange, White and Black Pads 7. Random Microfiber Towels (for wiping down the manifold between sanding/polishing) 8. Epoxy Resin/Hardner 9. Random Paint Brushes First, lets take a look at the damage. As you can see, there are several cracks, some of which go down deep into the carbon weave. The bottom was the worse, and I didn't see any of this damage when I agreed to buy the kit. Would it have changed my mind if I knew the bottom was cracked to this extent? No, probably not, but I was a bit surprised the shipping company managed to do so much damage to this thing.         The first step was to fill the cracks. So I mixed the epoxy resin at a 100:60 ratio per the instructions, and began to paint it on. I did the bottom first, so if I messed it up, it wouldn't be noticeable when installed. I took a little different approach with the top than with the bottom. I really lathered the epoxy on the bottom, not taking into account that whatever I put on, I had to take off. When it came to the top, I learned from my mistake and used the resin more sparingly, only spreading it into the crack and trying not to stray too far out from the cracks themselves.     After the epoxy cured for 24 hours, it was time to begin the sanding process. I began dry sanding, but soon learned that wet sanding worked a little better, kept the dust down, keep the paper clean, and made the paper slide a little smoother. The sanding process is by far what took the most time. 20 hours alone was probably sanding. Here are some pictures after epoxy and sanding with 400 grit. You can really see how the epoxy did a nice job filling in the cracks.  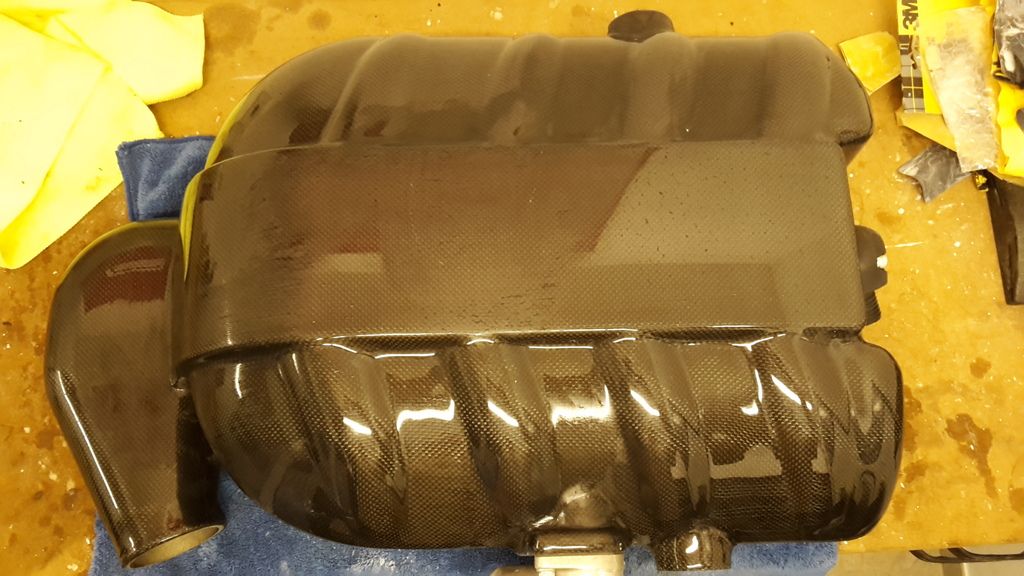   After sanding, and sanding, and sanding, moving all the way up to 1200 grit, the manifold was ready for compound with the polisher. The following pics were after 1200 grit sanding   My compound/polish routine was basically as follow: 1. Yellow (heavy cutting) pad w/ M105 (2 times) 2. Orange (medium-heavy cutting) pad w/ M205 (2 times) 3. White (medium-light polishing) pad w/ M205 (2 times) 4. Black (finishing) pad w/ Gold Class carnauba wax (1 time) After step 1:    After step 2:   After step 3:     After step 4 (finished product):   There you have it. This was a brief overview of the process I took in saving my carbon fiber manifold. I am very pleased with the results. Having never done this before, I was honestly unsure if I would ever get the shine back in the clear finish once I started sanding, but you can see what a vast improvement even step 1 was after the 1200 grit sanding was completed! As far as the cracks, can you still see the them? In some places, yes, but some of the cracks were very deep and I didn't honestly expect them to disappear completely. Some are now barely noticeable (mostly on the bottom) and others you wouldn't even know they were there unless you look hard. There are a couple that are still apparent, but the improvement on them is huge. The important thing is, I got the manifold to a place where I feel comfortable running it as is so I don't have to paint it, and the cracks won't spread any further. I honestly don't believe that once the manifold is installed in the car anyone will notice the cracks on the top unless they look hard and the light hits them just right. This process essentially saved a $1500 manifold from a $300 paint job. 
__________________
Current: 2007 Porsche 911 Turbo Former: ESS Supercharged ///M3 Interlagos Blue ZCP Subscribe to YouTube: https://www.youtube.com/c/Rat3dM Follow me on Instagram: https://www.instagram.com/rat3d_m/ Last edited by Rat3d ///M; 07-02-2016 at 05:33 AM.. |
Post Reply |
| Bookmarks |
|
|