

| 04-17-2015, 11:06 AM | #1 |
|
Captain
 
75
Rep 991
Posts
Drives: 2015 BMW M4
Join Date: Apr 2014
Location: Fairfax, VA
|
ARMA Intake DIY & Basic Impressions
Hey guys,
In the tradition of long-winded posts, and being inspired by some of the recent greats of DIY/review (you know who you are), I figured I would give it a go. I've got a decent sized list of mods that I someday hope to get fully flushed out, but given that I'm not immortal nor am I printing money... well, I had to prioritize. I thought about the aspects of the car, thought about what I loved and what I would love more of, and I realized one important thing about myself... I am a turbo whore. I love the whoosh of a well-spooled turbocharger. Every first mod on every car that I've had (that has been turbocharged) has been an intake to accentuate that noise - why break with tradition!  That being said, I did some research on the forums and also put my google-foo to work. I've read the tales of what might yet come from one well-known manufacturer here, as well as the performance claims from another lesser-known one, but ultimately it was ARMA that I decided to go with. Partly because they were great to deal with over email, but also because the couple photos I saw of the installed result seemed on-point with what I was expecting to get out of an intake on the M4. Here's an important point I think is worth making (and this is not a jab at anyone in particular): an intake on this car, without tuning or whatever else, is meant for two things... to be good looking, and to sound nice. This may be debated, but I don't want to get into that; I'm merely giving you my state of mind in the selection and how I'll approach reviewing it. Big props to Snipe4real for all his hard assistance (and beer!) during this install. Thanks to ARMA for the customer service and working with me to make my install a reality. I also want to apologize in advance for some of the photos I'll put up here, a couple are a bit blurry. We didn't have the best lighting situation, and sometimes the pictures were a little rushed. For those with no time, the TL;DR is this:
LETS GET ON WITH IT What you need:
How long did this take us: end to end it was about 2 hours, might have been a little more, but that also includes the time we spent going "HUH?" with the instructions at first. I think this could be done in under an hour with an enterprising hand. PACKAGING & INSTRUCTIONS  The packaging was pretty good! The product ships from Taiwan, and actually arrived to me within 4 business days of finalizing the order. I have to give major props to ARMA here, because I've definitely had longer shipping times from domestic car performance companies. 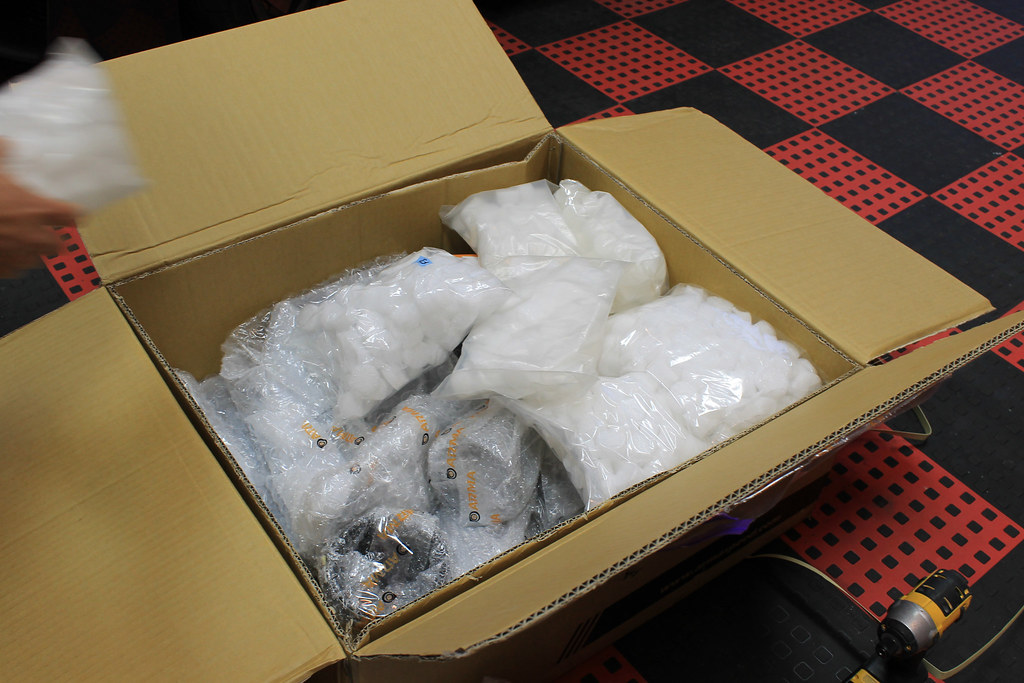 Inside, everything was wrapped quite nicely. Not wrapped in microfiber a la IND, but well placed and protected none-the-less. We inspected all the pieces for any scratching, but it all seemed top notch. We couldn't help from going "wow" and "this piece looks great" each time we pulled something out of the protective wrapping. 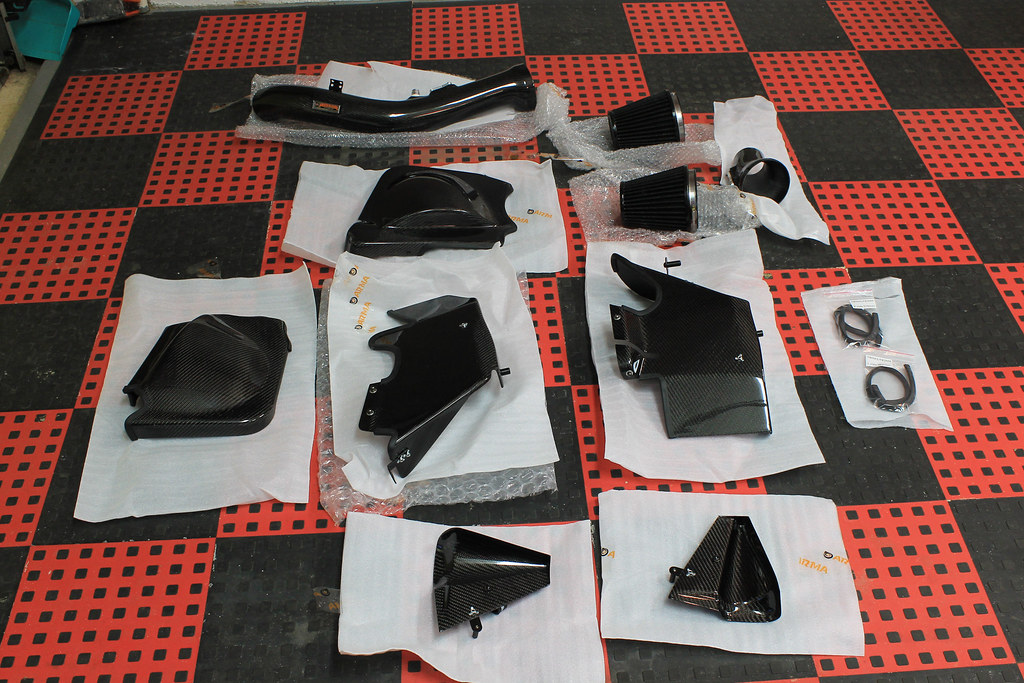 We got everything laid out on the floor and took a quick inventory. Now, I don't have a photo of the instructions they provide, but let's just say that they aren't the most clear. You get a listing of all the parts you should receive, to include the screws and whatnot, as well as the instructions themselves in the form of some black and white photos (ARMA provides a digital color version on request, but didn't ship a color one in the box for some reason). There was a brief moment where I thought "wait, does the kit not come with all these loose nuts and bolts they have on here?" before realizing that everything came pre-attached to the pieces where they belong. Denoting each item on the instruction list is good for double-checking, but that's all it is there for (no additional pieces required - except for maybe zip ties, will get to that later). 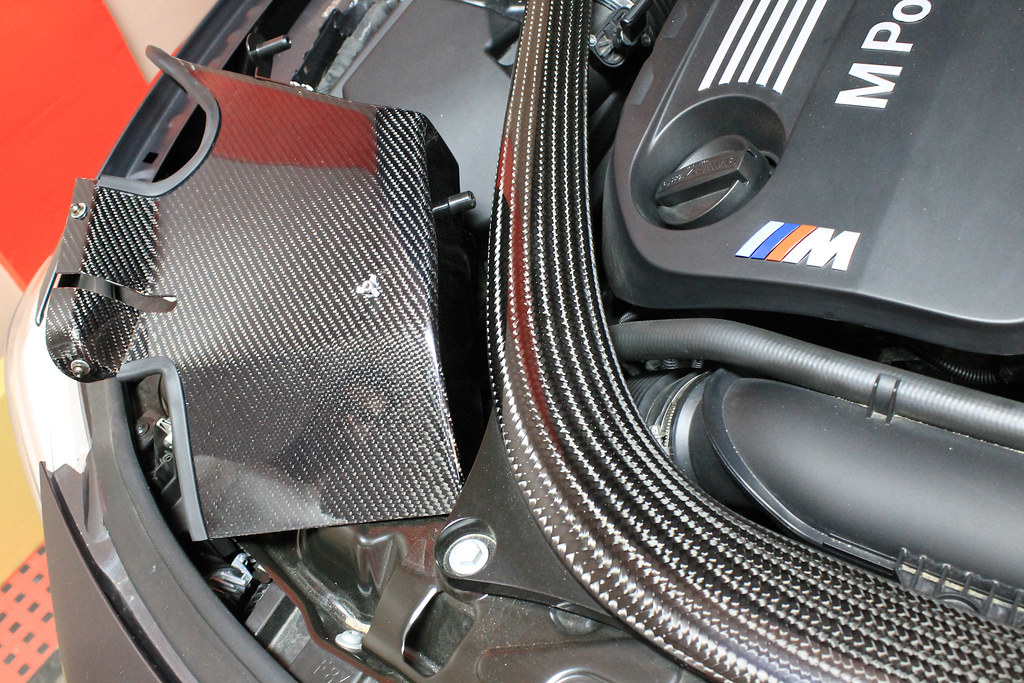  In the couple threads here on the product, I know people have asked about weave comparison. I don't know really much about the actual production of CF components, so I'll let others be the judge as far as technical bits go - but as far as looks, we felt they were pretty spot on with the existing stock brace. Last edited by IMrMark; 04-17-2015 at 11:12 AM.. |
| 04-17-2015, 11:07 AM | #2 |
|
Captain
75
Rep 991
Posts
Drives: 2015 BMW M4
Join Date: Apr 2014
Location: Fairfax, VA
|
START TO TEAR THINGS APART
 You need to take out the stock CF brace in order to get to things and remove the stock intake piping. This is probably an obvious thing to say, but might as well say it. Credit to tom @ eas for posting a related DIY that we used for this process (so I won't go into much detail here): eas | DIY: S55 M3/M4 BMC Filter Installation  Ensure proper lighting! We felt the garage really wasn't enough, so we got a little creative. Just when you think you don't have a lightbar, go raid the fishtank.  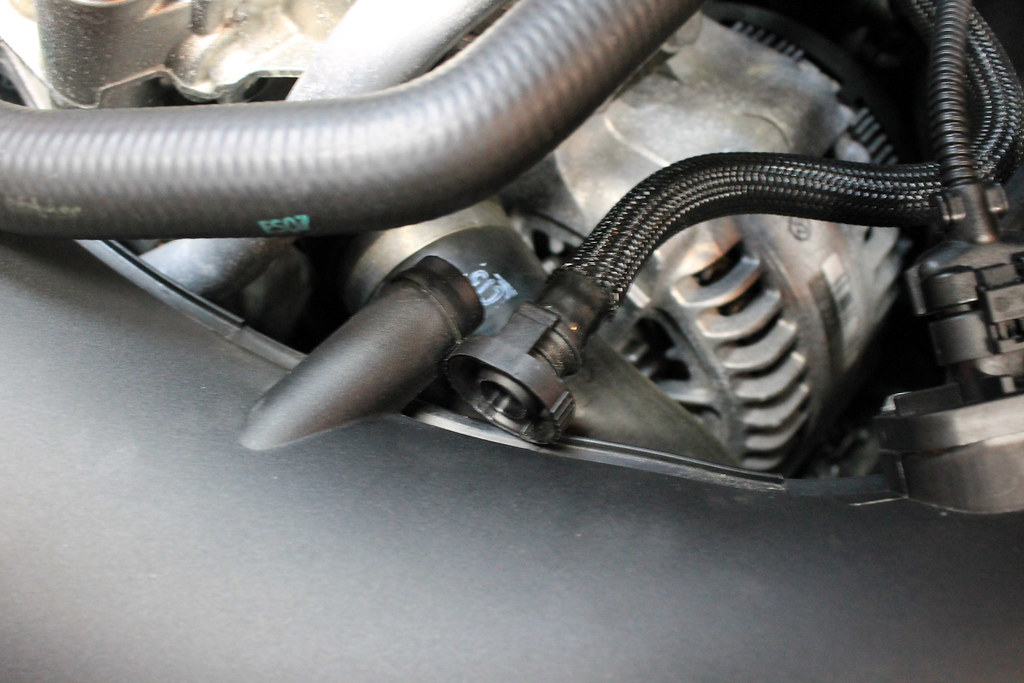 We started out by removing the sensors and piping attached to the stock intake. You've got the MAPs (the flat looking pieces) as well as a return hose that I assume is for recirculation. We found the easiest way to carefully handle the MAP sensor was to remove the connector, then ease out the sensor housing itself. We used a very small flathead screwdriver to gently pry the retaining clip for the cabling, which then just slid right off without much force at all. We then pulled out the sensors themselves (they just slide right back) and carefully set aside. For the return hose that's on the driver's side intake piping, just get a good grip on the raised bevel on either side (left/right) and pull straight back gently; I had to apply a little bit of force, but not too much. Unscrew the retaining brace until you can feel it move free around the piping and then gently disconnect the tubing (yes the top half of the stock airbox comes with it). 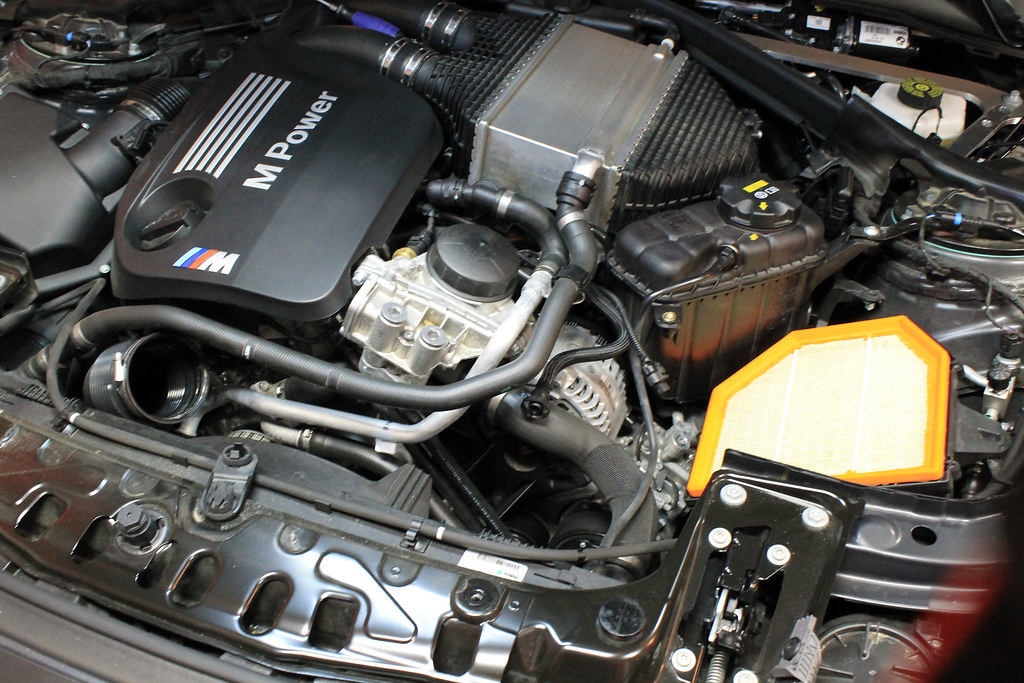 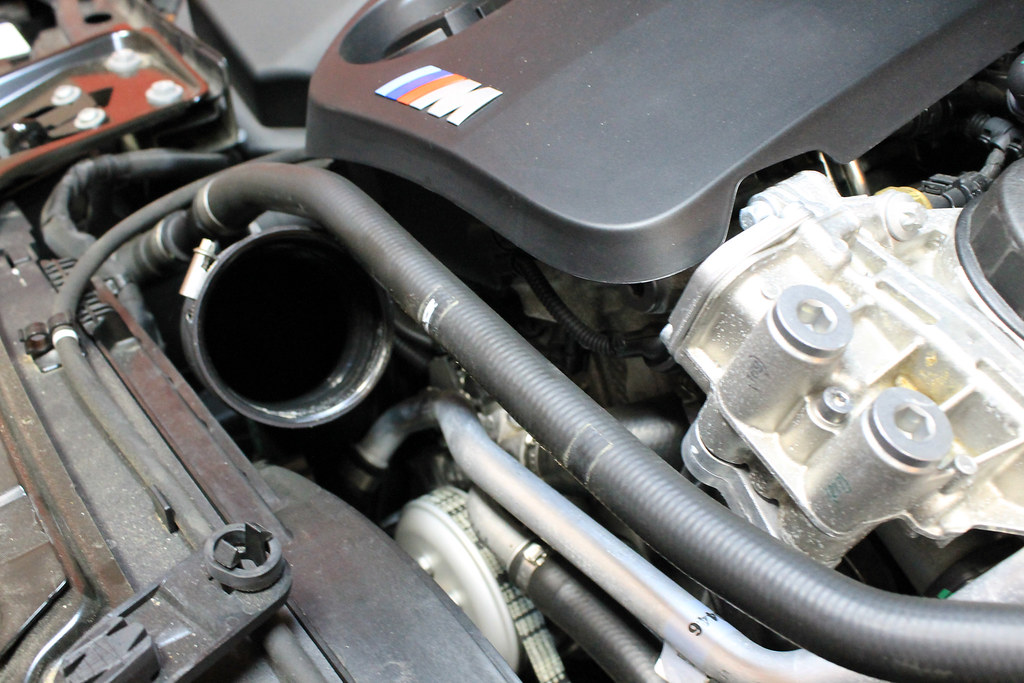 Here you go, driver's side piping removed. A little dirty, actually. You're gonna do the same thing essentially on the passenger side, but it's much less connected so it'll slide right out. If you have any issues with doing this, just rotate the pieces a little clockwise/counter-clockwise to loosen them up as you pull them out. 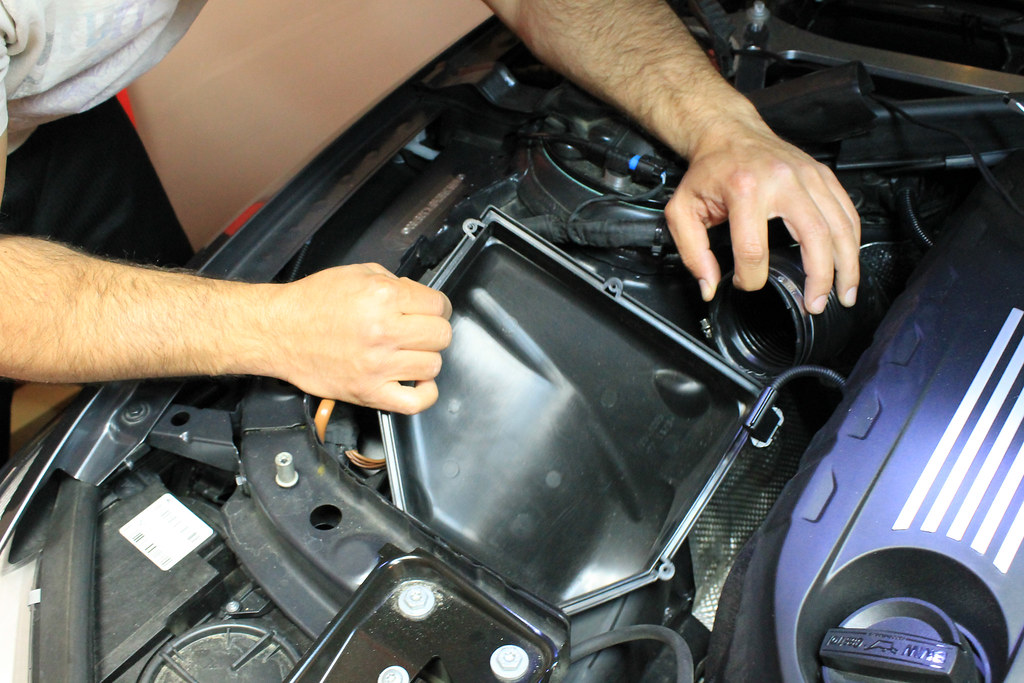 OK - all that should be left to remove now are those pesky stock airboxes and filters. Take the filters and the carbon stuff and set them aside, then remove the two stock airbox base pieces by simply lifting straight up.   Driver's side and passenger side respectively, empty of their stock intake components. Those holes you see are the rubber mount points for the stock boxes you would've just pulled out. 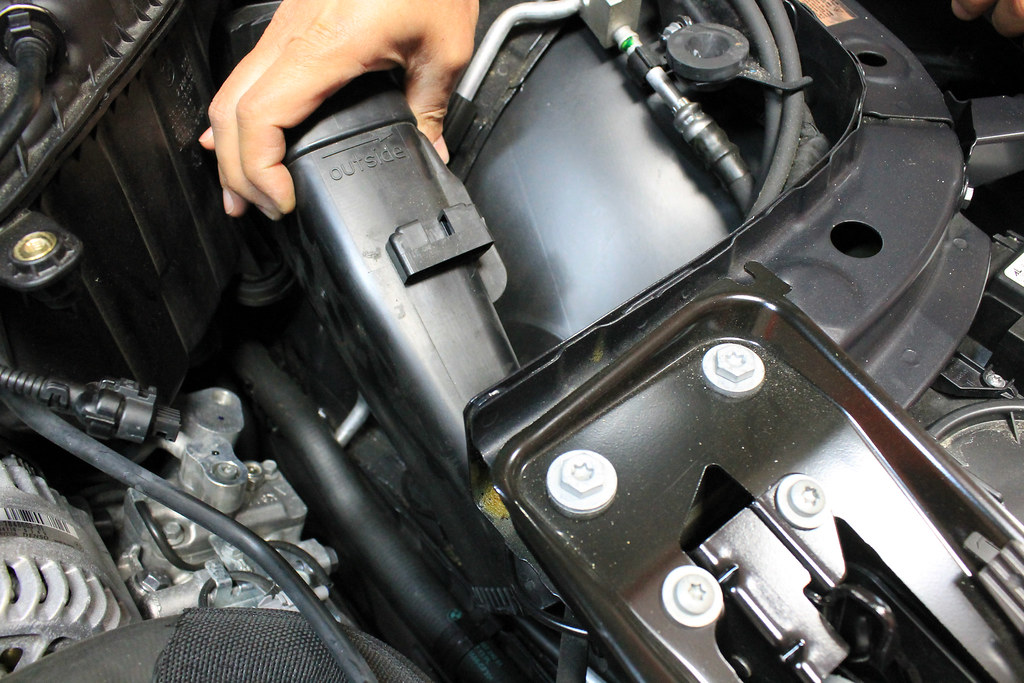 So, I wasn't sure if I wanted to include this or not, but I think I will as a warning. To make things a little easier, it might seem reasonable to temporarily pull out the plastic air duct that brings the air right up to the stock filter box. On the driver's side, this will allow you to more easily drop in the cf sidewall piece and get it situated. But seriously, just don't do it. It's a fools errand and doesn't save you any time, because putting that piece back in can be a pit of a pita. Last edited by IMrMark; 04-17-2015 at 01:44 PM.. |
|
Appreciate
1
|
| 04-17-2015, 11:09 AM | #3 |
|
Captain
75
Rep 991
Posts
Drives: 2015 BMW M4
Join Date: Apr 2014
Location: Fairfax, VA
|
PUT IT BACK TOGETHER
Now the real fun begins, getting your hands on that delicious new intake and putting it where it belongs. First, though, you have to... figure out where it belongs. The instructions are not super helpful here, so we played the game of Tetris for a little while trying to figure out exactly which of the two sidewall pieces went passenger vs driver. Maybe ARMA will comment here and go "hey dummy, it says it right xxx" but we didn't see anything. The big clue was the slit cut out for some hosing on the passenger side, which eventually got us to the finish line.  Here is the passenger side put into place. This just drops right in and slides underneath the air duct on that side. I say drops right in, but you'll need to manhandle it to get it to slide underneath, don't be afraid. 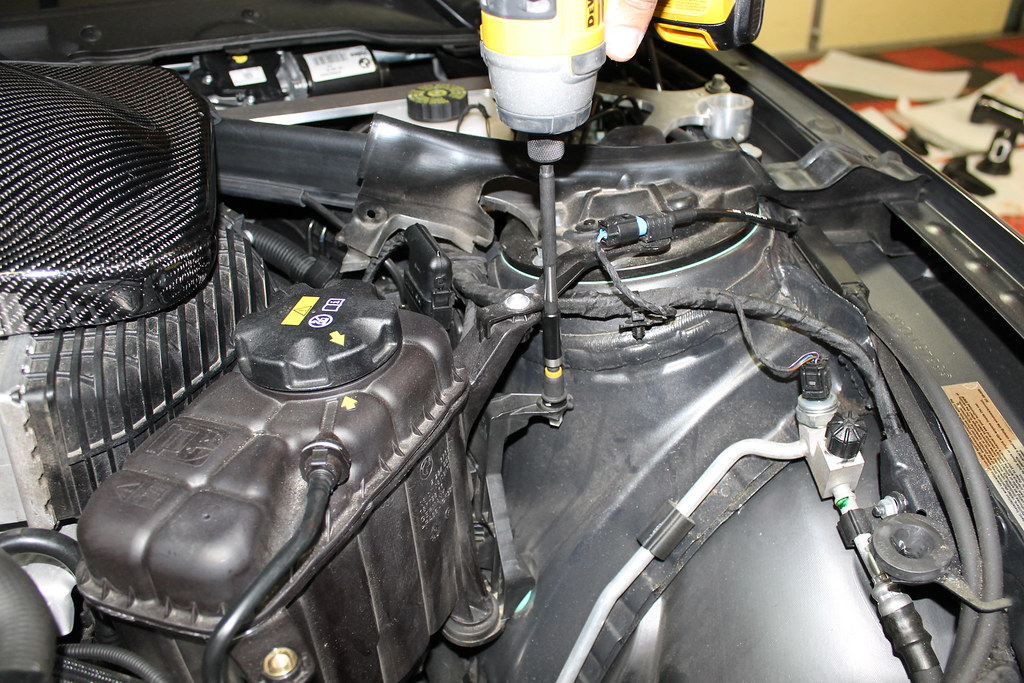 On the driver's side, you'll need to loosen this bolt (10mm) since the CF piece will attach to here for support.  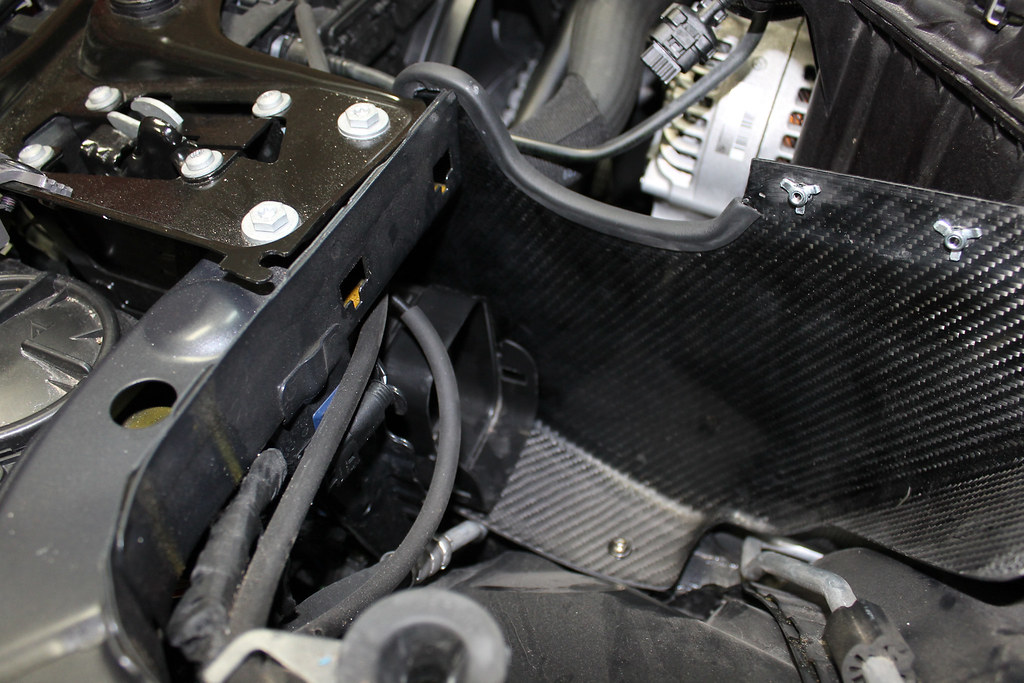 Here we have the drivers-side installed. Now you can get excited and start to put things back where they belong. We started with the passenger side. 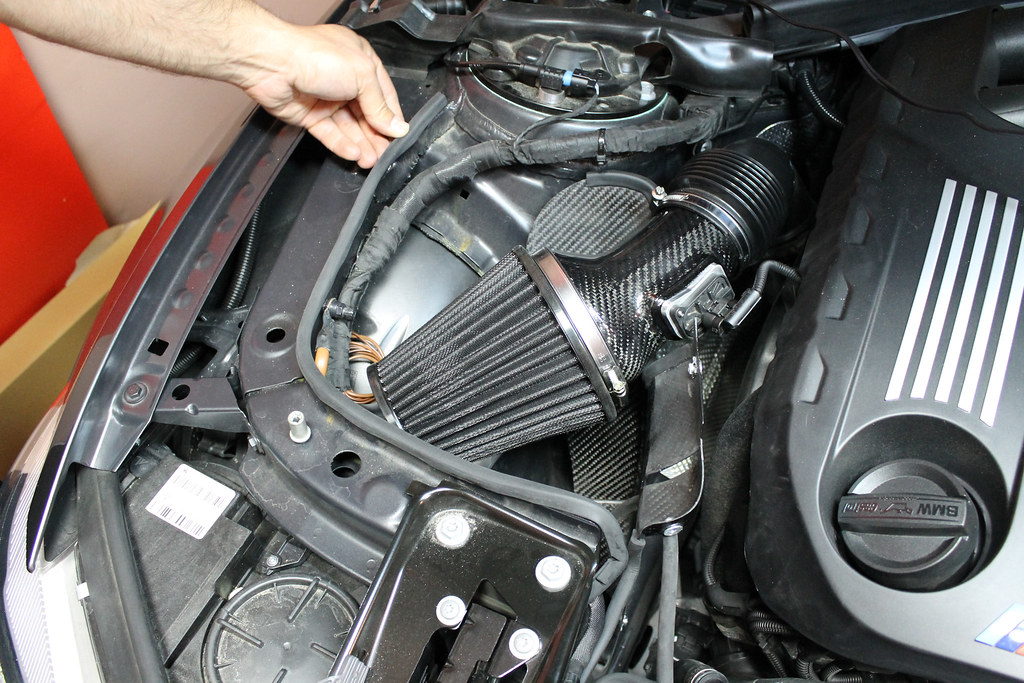 Attach the new cone filter to the angled piping, secure the MAP sensor and then slide the whole assemblage into place. We had some issues with the piping slipping off when we would get it nice and tight. We didn't feel we were over-tightening it, and seemed like maybe it was a little oily or something. Snipe4real went ahead and cleaned off the contact points, then reattached - all seemed golden. You likely could just put some electrical tape if you find yourself concerned, but we didn't give that a try. Secure the included rubbers over the exposed metal. One thing worth mentioning as a YMMV - there is a grounding line in this area that we had to rotate downwards a bit in order to close everything else. 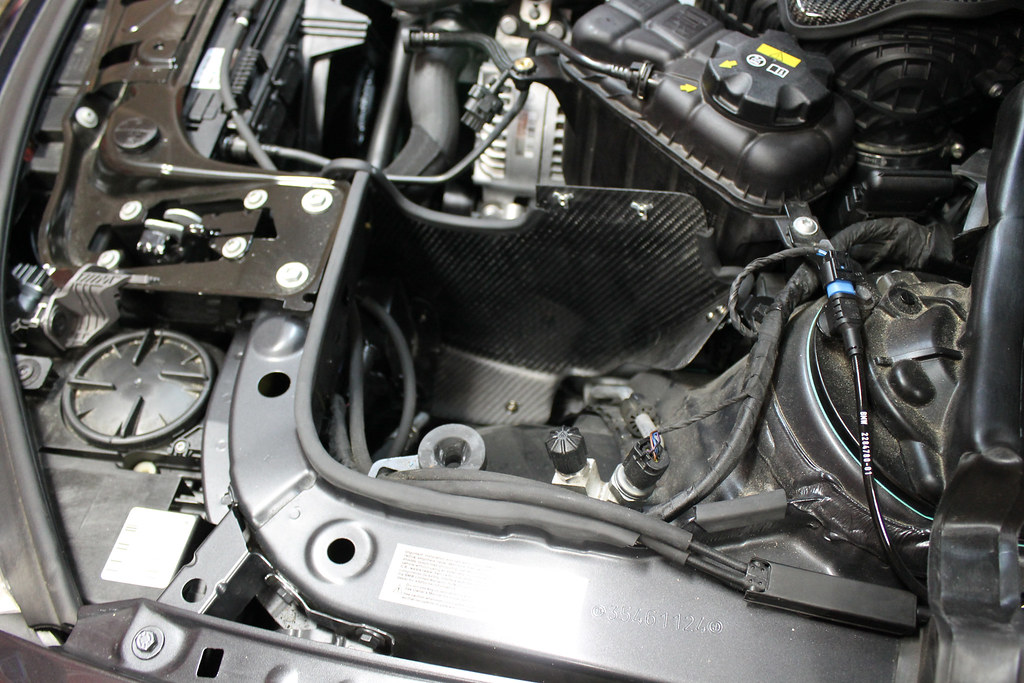 Prepare the rubber on the driver's side and drop in the piping, filter, etc. 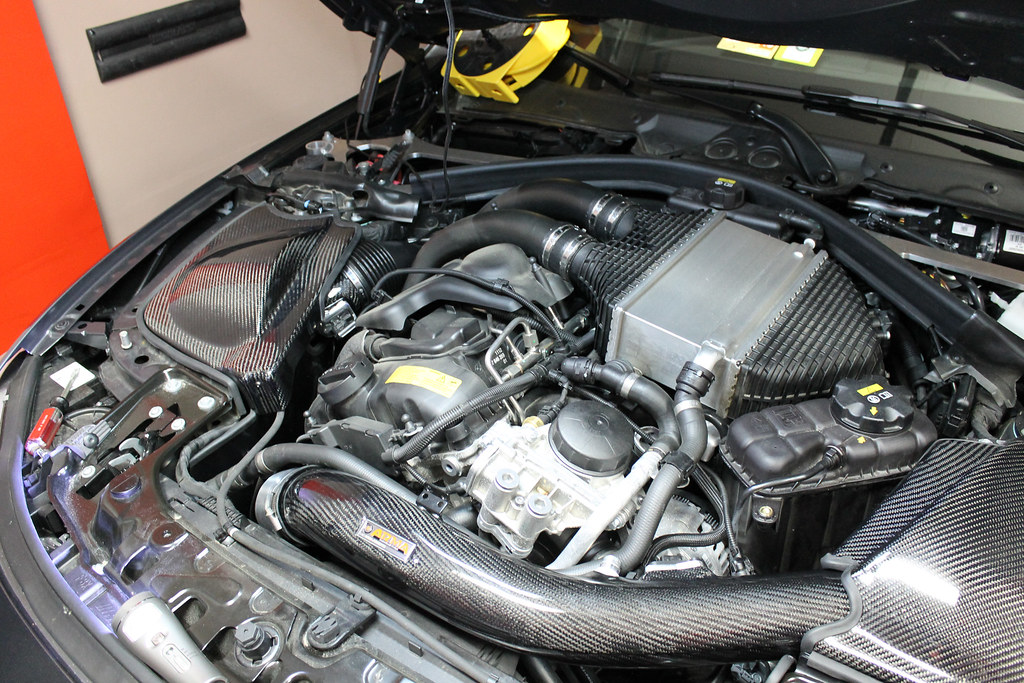 Don't tighten things too much yet since you need to get the lids put on top and attached, will will definitely require you and your buddy to muscle things in order to get the connection points to line up properly. In this photo, you can see that we've already lined up and attached the screws for the passenger side. We had to hand-tighten the initial threading, then use screwdriver to really get a good seal from there.  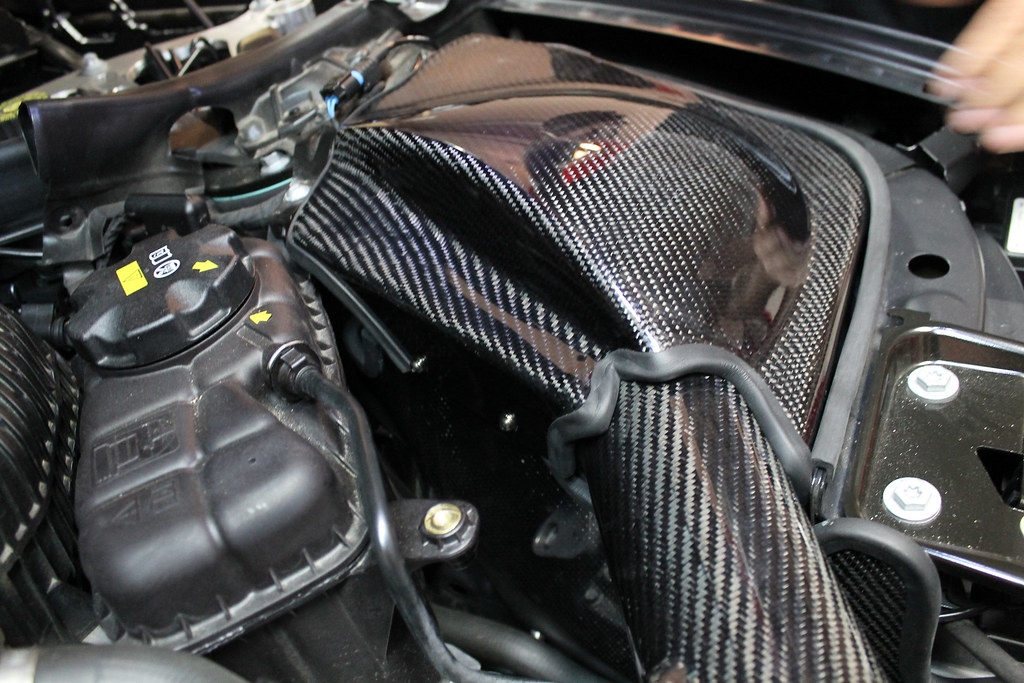 On the driver's side, you've got kind of a tight space to work with. We found the best was to get in underneath the sidewall piece and lift it slightly while pressing down on the lid, this lined things up nicely and we could thread in the screws. Fix up any rubber that slides off during said muscling. Reattach sensors, hoses, and tighten up the piping.  The included zip ties. These are supposed to secure the intercooler hosing that used to be clipped onto the stock intake.  We tried - they're way too small. Grab some about twice the size and just clip them down. ALMOST THERE... You've got two more things on the to-do list, and one of them involves taking off the front grills. I've got a solid picture of Snipe4real removing them, but I'll save him the face-time. Remove them however you think best, I'm not sure all would agree with how we did it. Lay down some microfiber as you get in there, just to be safe. 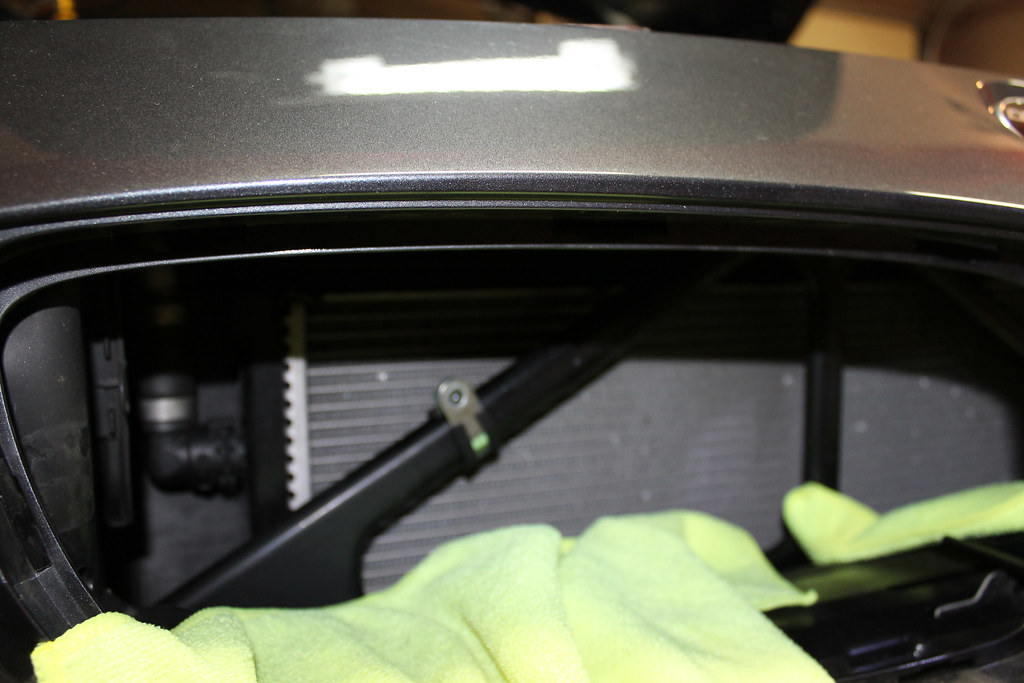 These pieces that go on the front are small and rectangular, and a little annoying to place - but not hard after you do it once. Remove the pre-assembled metal clamp and line it up on the support piece as pictured. Try to get it as set as possible now, because next you'll blindly place the CF over it and thread that needle with the bolt. For us, once we got the bolt fully passed through, it was just a matter of getting the supplied washer and the nut put on the back.... you're going in blind, so you have to feel it out all without dropping washer or nut. Once you get it finger-tightened (because no one is getting a whole hand back there), get creative with some small tools to get it nice and snug. 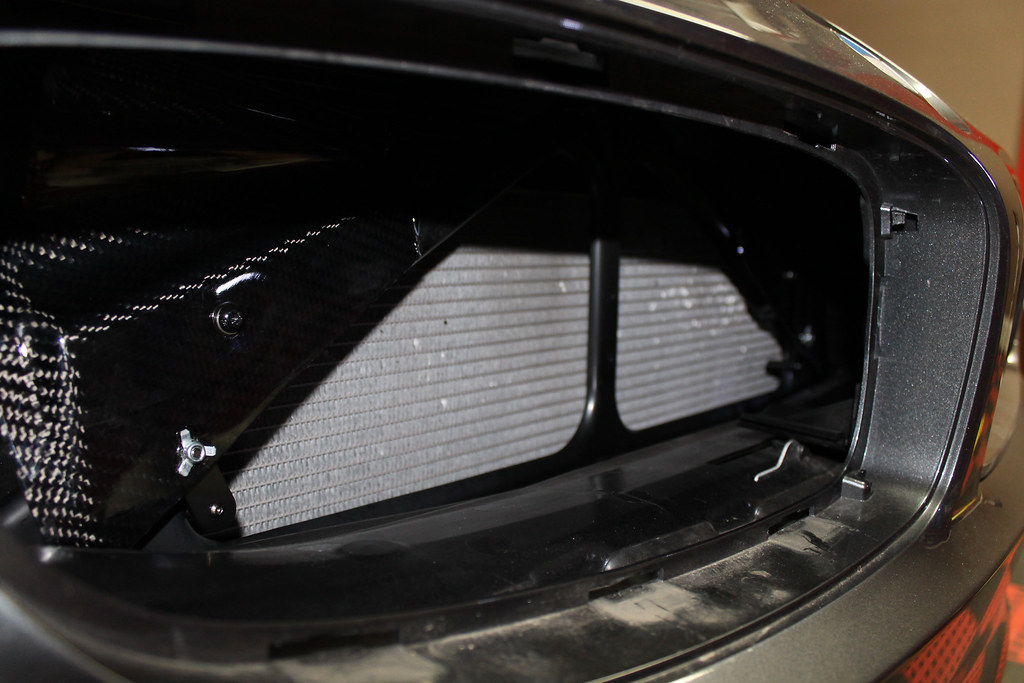 Here's about how it should look when you're done. Do the other side and then reattach the grill. Reattach the brace and the plastic trim you removed in Tom's filter DIY and then... |
|
Appreciate
2
|
| 04-17-2015, 11:12 AM | #4 |
|
Captain
75
Rep 991
Posts
Drives: 2015 BMW M4
Join Date: Apr 2014
Location: Fairfax, VA
|
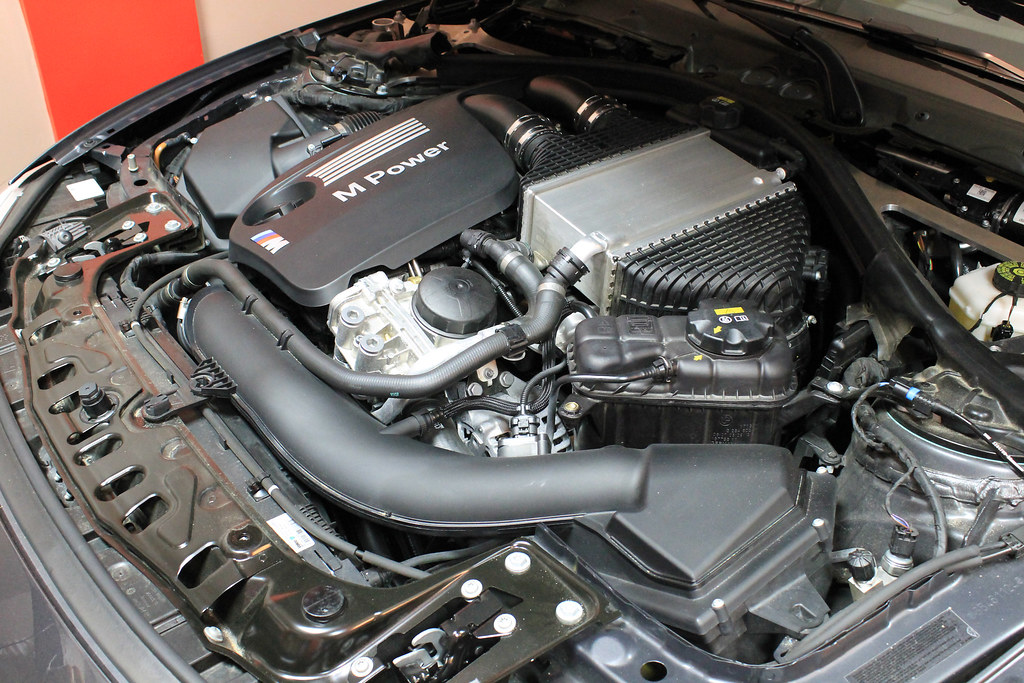
SUCCESS!
  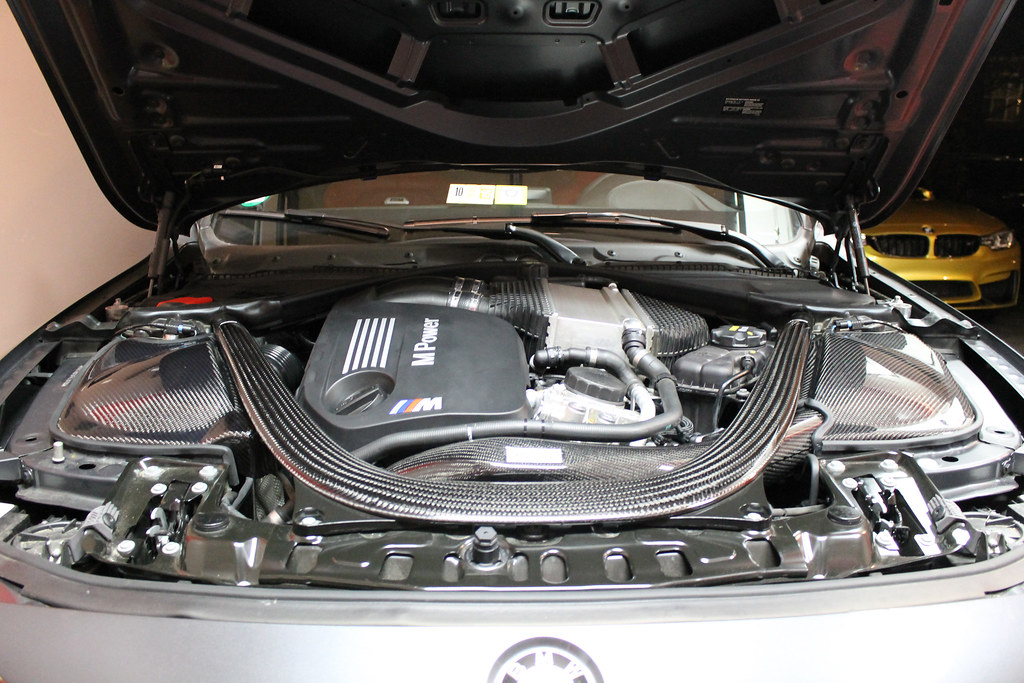 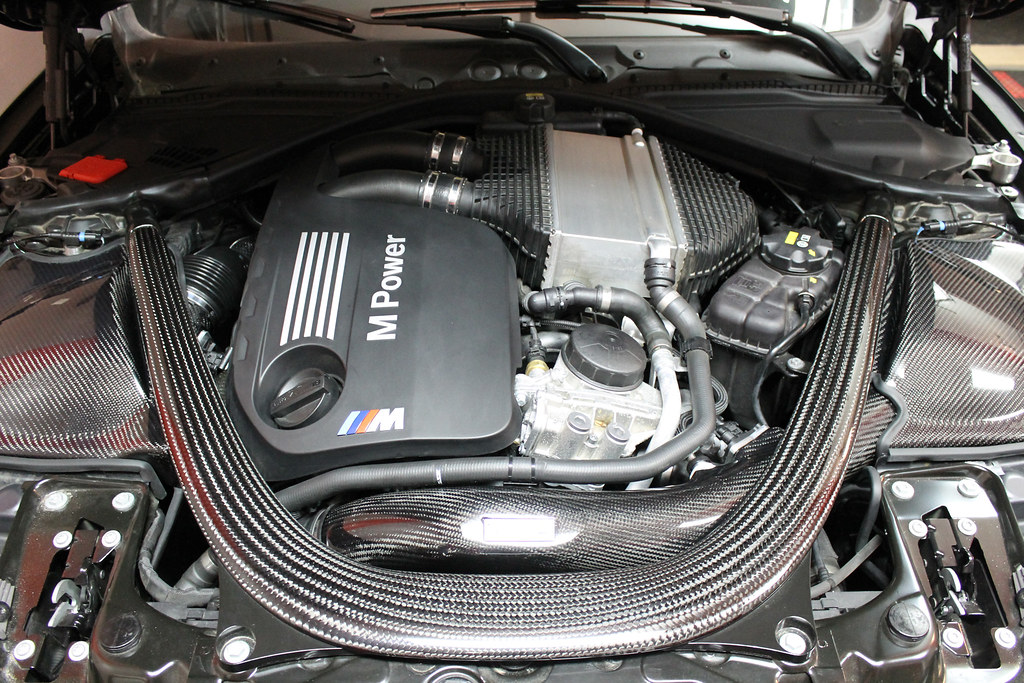    Clean up and celebrate, for my friend you are finished! Summary Thoughts The ARMA intake is a really nice looking piece of work, and I'm sure we're going to see many more things like it in the future from other performance outlets. There is an extremely noticeable difference under any amount of load when the turbos are doing their thing, and sometimes even when you're just driving with the stereo off in efficient. Want to really hear this roar? You get into sport-plus and you drive it like you stole it. Is it worth the full MSRP? Well, that depends on the other options available and what you're looking for. I was looking for, and expecting, a good looking product that fit well in the bay, while also producing a solid (but not obnoxious) amount of turbo sound. It does this for me, definitely. So if you're in the market and this guy has been floating on your list as a top contender, I'd say give it a go. You aren't going to be getting 50 extra hp out of it (just a statement), but if you're not worried about that from an intake anyway, I don't think you'll be disappointed. Just make sure you have a good buddy with some good beers to back you up during the install.
__________________
2015 ///M4 F82 [ Mineral Grey | SO Ext | 19" Black | 6MT | CFRP Interior | LED | Executive | Side/Top Cameras | Adaptive M Suspension | HK Surround ] :: will code locally for rum, beer, or chicken; PM as desired :: Instagram: IMrMark |
|
Appreciate
3
|
| 04-17-2015, 01:38 PM | #6 | |
|
Captain
75
Rep 991
Posts
Drives: 2015 BMW M4
Join Date: Apr 2014
Location: Fairfax, VA
|
Quote:
__________________
2015 ///M4 F82 [ Mineral Grey | SO Ext | 19" Black | 6MT | CFRP Interior | LED | Executive | Side/Top Cameras | Adaptive M Suspension | HK Surround ] :: will code locally for rum, beer, or chicken; PM as desired :: Instagram: IMrMark |
|
|
Appreciate
0
|
| 04-17-2015, 02:08 PM | #7 |
|
Colonel

2712
Rep 2,371
Posts |
Nicely done DIY. One thing: I didn't know about those pieces in the very front, that you can see through the grill. I wonder how much airflow to the ICs they cut off and how much effect that will have.
__________________
2015 Black Sapphire Metallic 6MT M4
|
|
Appreciate
0
|
| 04-17-2015, 02:42 PM | #8 | |
|
Captain
75
Rep 991
Posts
Drives: 2015 BMW M4
Join Date: Apr 2014
Location: Fairfax, VA
|
Quote:
I totally agree with your concerns on the pieces up front, but I will say that in person they don't seem to take up that much space (but as we know, a little can go a long way with heat exchange). I had questioned ARMA about this when I was reading through their info originally, and their reply was that there was still a lot of air flow permitted to the front radiator and that their customers hadn't had an issue with it to this point. Not a reply with technical reasoning or data so not much to go on there. I'm hoping to get some technical-ish data by trying to compare some data from the Awron Gauge readouts to anyone on here who also has access to that realtime data as well. The one heat-exchange I would really be concerned about would be for the intercooler near the base of the bumper (if I remember right), and this shouldn't impact that at all. Thank god there is already a DIY for Awron so I won't feel compelled to do one again so soon
__________________
2015 ///M4 F82 [ Mineral Grey | SO Ext | 19" Black | 6MT | CFRP Interior | LED | Executive | Side/Top Cameras | Adaptive M Suspension | HK Surround ] :: will code locally for rum, beer, or chicken; PM as desired :: Instagram: IMrMark |
|
|
Appreciate
0
|
| 04-17-2015, 02:48 PM | #9 |
|
Currently Driving
269
Rep 1,426
Posts
Drives: BPM tuned '13 AW ZCP E92 M3
Join Date: Sep 2012
Location: Rochester, NY
|
Nice write up! A nice go pro video so we can listen to the sounds can add to the great review!
|
|
Appreciate
0
|
| 04-17-2015, 03:58 PM | #11 | ||
|
Captain
75
Rep 991
Posts
Drives: 2015 BMW M4
Join Date: Apr 2014
Location: Fairfax, VA
|
Quote:
Quote:
__________________
2015 ///M4 F82 [ Mineral Grey | SO Ext | 19" Black | 6MT | CFRP Interior | LED | Executive | Side/Top Cameras | Adaptive M Suspension | HK Surround ] :: will code locally for rum, beer, or chicken; PM as desired :: Instagram: IMrMark |
||
|
Appreciate
0
|
| 04-17-2015, 05:15 PM | #13 | |
|
Captain
75
Rep 991
Posts
Drives: 2015 BMW M4
Join Date: Apr 2014
Location: Fairfax, VA
|
Quote:
__________________
2015 ///M4 F82 [ Mineral Grey | SO Ext | 19" Black | 6MT | CFRP Interior | LED | Executive | Side/Top Cameras | Adaptive M Suspension | HK Surround ] :: will code locally for rum, beer, or chicken; PM as desired :: Instagram: IMrMark |
|
|
Appreciate
0
|
| 04-17-2015, 07:06 PM | #14 |
|
Lieutenant Colonel
 445
Rep 1,529
Posts
Drives: YMB F80 M3
Join Date: Feb 2012
Location: Socal/ SGV 626
|
Awesome write up man!!!
__________________
2015 BMW M3 (Yas Marina Blue)| Toyo Tires | Moton Suspension |
Instagram: YMB_F80 |
|
Appreciate
0
|
| 04-18-2015, 04:29 AM | #15 | |
|
Captain
75
Rep 991
Posts
Drives: 2015 BMW M4
Join Date: Apr 2014
Location: Fairfax, VA
|
Quote:
__________________
2015 ///M4 F82 [ Mineral Grey | SO Ext | 19" Black | 6MT | CFRP Interior | LED | Executive | Side/Top Cameras | Adaptive M Suspension | HK Surround ] :: will code locally for rum, beer, or chicken; PM as desired :: Instagram: IMrMark |
|
|
Appreciate
0
|
| 04-18-2015, 11:50 AM | #16 |
|
Private First Class
 94
Rep 140
Posts |
Excellent DIY write up. Great job Mark! Thank you for sharing.
Question please and I apologize in advance if I am blind and I didnt see the info on your post. Where did you order it from, and how much? I checked ARMA website and I dont see any pricing info. Thanks very much in advance. Dan Last edited by whatheheck; 04-18-2015 at 12:03 PM.. |
|
Appreciate
0
|
| 04-18-2015, 07:49 PM | #17 | |
|
Lieutenant Colonel
445
Rep 1,529
Posts
Drives: YMB F80 M3
Join Date: Feb 2012
Location: Socal/ SGV 626
|
Quote:
__________________
2015 BMW M3 (Yas Marina Blue)| Toyo Tires | Moton Suspension |
Instagram: YMB_F80 |
|
|
Appreciate
0
|
| 04-20-2015, 05:49 PM | #20 | |
|
Major
 
241
Rep 1,418
Posts |
Quote:
 ribs and pulled pork but before a nice long drive with all 3 Ms and perhaps Syeds GT3 ribs and pulled pork but before a nice long drive with all 3 Ms and perhaps Syeds GT3 |
|
|
Appreciate
0
|
| 04-21-2015, 07:08 AM | #21 |
|
Lieutenant Colonel
1161
Rep 1,726
Posts |
money.
what does the butt dyno tell you? when i did the intake on my prior S4, i felt throttle/pickup was alittle quicker responding. i'm sure it sounds pretty awesome. i'm looking forward to seeing it in person.
__________________
My Trackable Street Car
2016 BMW M4 GTS |
|
Appreciate
0
|
Post Reply |
| Bookmarks |
|
|


