

| 02-12-2015, 12:03 PM | #1 |
|
Colonel
 1792
Rep 2,995
Posts |
DIY Oil Change Guide
Hi all,
This is a basic DIY for an oil change on the s55, which is one of the easiest cars to do an oil change on. I did my own oil change today because while I believe the S55 is one of the best temperature controlled BMWs ever built, a new engine is still a new engine and is going to create filthy oil for the first few oil changes. Tools needed: Jack & Jack Stand 7mm allen wrench OR 7mm allen socket (Let me confirm this size, this sounds small now that I think about it) 86.5mm / 16 flats oil filter socket like this one (http://www.amazon.com/Assenmacher-Sp...+filter+wrench) Ratchets to fit allen socket and/or oil filter socket Oil catch pan Gloves are recommended Parts needed: Oil Filter & new oil filter gaskets (2) 7 quarts oil (BMW 5w30 or BMW's new "M-specific" oil which is 0w40 are fine choices) New aluminum oil pan screw and washer All of these can come in a BMW supplied oil change kit for this model ... Prep: I recommend either changing oil hot or at least driving the car for 5 minutes beforehand. The oil will drain out faster and you will mix in the dirt in the oil into suspension that will drain our better if it's been mixed up right beforehand. Here are the steps: 1. Pop the hood and loosen the oil filter with your oil filter socket. This is just to ensure you can replace it before you start the rest of the job. The oil filter housing will drain oil back into the sump once you remove the oil filter abit, which is a good thing to do before you drain the oil from the sump.   2. Loosen the oil fill cap or remove it. This is important - the crankcase on this car is exceptionally tight and your oil will flow out significantly faster if you loosen the oil fill cap. I loosened the cap AFTER I started draining the oil and I basically heard a "whoosh" as the oil flowed so much faster  3. Ensure your car is in gear or at least the parking brake is set very firm. Jack up the car from one of the jack pads behind the front wheels on either side. Just jack it up enough to get under the car comfortably - make sure at least one rear wheel stays on the ground for safety purposes, as the rear wheels are what is preventing the car from rolling. 4. Place a jack stand under the car. Look for an all-metal surface and not a suspension arm. The edge of the aluminum belly pan is flat and a good place to place a jack stand for this job. In this situation to me the jack stand is there for an emergency - you want it under something that will keep the car from falling on you.  5. Locate the oil drain. It's towards the back of the aluminum belly pan. It's an inset hex key bolt head in an opening in the belly pan. No need to remove the belly pan or any sort of flap to expose it.  6. I used a 7mm allen wrench to remove this. It took a bit of effort to break loose, but literally just a bit. Then it spun freely. The allen wrench was actually a nice approach as when the bolt came free my hand was well to the side of the oil flow. Drained very cleanly. 7. Let the oil drain until it's just dripping. 8. Nows a good time to replace the oil filter. It's a press-on unit, so just wiggle the old one back and forth with some pressure to remove it from the oil filter housing cap. Then pop the new one on in the same orientation (text on the filter faces up). The oil filter has two gaskets are on it. One is a very small green rubber o-ring about 1/2-3/4" in diameter. Pry it off with a small flathead screwdriver if you'd like but be careful not to mar the oil housing. Put the new one on and make sure it has some old oil on it - don't leave the gasket dry as you install it. Same thing with the big ~3-4" black o-ring gasket. It's purpose it to seal the oil filter housing cap to the oil filter housing. You pry it loose with a flathead screwdriver and work it off. Replace it the same way and give it a light coating with oil before installing it. 9. Install a new oil drain plug with a new washer assuming it's just slowly dripping. 10. I'm going to be a bit old school here. I tighten my oil drain plug and oil filter by feel and look, not my torque value. If you are uncomfortable or low on experience, use a torque wrench and torque to the appropriate value. I visually make sure the parts are seated and feel for it tightening up progressively as that seating occurs. I then seek a 1/8-1/4 additional turn which continues to get progressively harder to ensure the gasket is seated. In no case should it become very hard or suddenly want to stop moving. If it does that, you've tightened it more than enough 11. Assuming you let everything drain plentifully, pour 6.5 quarts of oil back in the top. 12. Check for leaks 13. Start the car and let it sit for 30 seconds to make sure no lights come on representing a lack of oil pressure building 14. Drive the car till you hit operating temp, park on a flat surface in neutral, and use iDrive to check your oil level to ensure it is topped off. ... Most here will either let someone else do their own oil changes or are super familiar with doing their own. This is just for those who might want to do some themselves and want a little familiarity with the process, parts needed, and tools needed.
__________________
AW/Carbonstructure 6MT 2015 M3 picked up 8/22/2014. Stripper except for adaptive suspension. Weighed at 3,450 pounds with 1/4 fuel. 70,000 miles as of February 2020.
Last edited by JoeFromPA; 02-12-2015 at 12:53 PM.. |
|
Appreciate
17
Xtabi1700.00 DreamSlider ///M35.00 Race_Doc11458.00 kendrick0730.50 MyFragileHalogen448.50 Comsat1.50 manat.07.50 BananaSlug76.50 GordoNx3o9201.00 BMWTarga7.00 NWH8313.50 |
| 02-12-2015, 12:18 PM | #2 |
|
Trued

127
Rep 231
Posts
Drives: Saab 9-3 AERO Convertible
Join Date: Aug 2014
Location: Stockholm, Sweden
iTrader: (0)
Garage List 1978 SAAB 99 TURBO ... [10.00]
1977 SAAB 99 TURBO ... [0.00] 1978 SAAB 99 TURBO 3D [8.50] 1966 SAAB 96 MonteC ... [0.00] 2004 SAAB 9-3 AERO ... [0.00] |
What oil do You use? Heard that BMW is moving away from Castrol and introduce Shell as the household brand.
__________________
Jörgen Trued, Stockholm Sweden
|
|
Appreciate
0
|
| 02-12-2015, 12:54 PM | #4 |
|
Useful Idiot

1330
Rep 1,777
Posts
Drives: My wife and kids insane.
Join Date: May 2011
Location: West Chester, PA
|
Awesome, thanks for that Joe.....great tutorial.
This is my first M, does anyone use Mobil 1? With other cars (especially in the VW community) Mobil 1 was the king of all. Or is it really that you use one particular brand, like Castrol?
__________________
|
|
Appreciate
0
|
| 02-12-2015, 12:59 PM | #5 |
|
Colonel
1792
Rep 2,995
Posts |
There's no secret to it
But certain oils are better suited than others. M1 0w40 is a superb oil for long life + the running characteristics of this engine. Castrol makes several good choices. Now BMW is switching to Shell and selling an oil under that moniker. |
|
Appreciate
0
|
| 02-12-2015, 01:19 PM | #6 | |
|
Private

18
Rep 82
Posts |
Quote:
Some suggested changes to the procedure. Install the new oil drain plug Put the new oil filter in the housing Slowly pour 1 quart of oil on the filter in the housing. This pre-fills the filter and gets the oil flowing through the system faster. Less dry running. Put the filter cap on the filter housing Fill the rest of the oil as regular |
|
|
Appreciate
0
|
| 02-12-2015, 01:46 PM | #7 | |
|
Second Lieutenant

112
Rep 210
Posts |
Quote:
|
|
|
Appreciate
0
|
| 02-12-2015, 02:49 PM | #8 | |
|
Colonel
1792
Rep 2,995
Posts |
Quote:
I'm basing this comment upon what I observed, not what I tested. I observed that upon removal of the old oil filter the old oil only THEN drained down. I did not try to fill the oil filter housing with new oil, as I have done on other cars. FYI, I didn't even have the oil pressure light come on for a second upon starting. Oil pressure was built instantly (I'm guessing through the oil filter bypass mechanism). Also, a car with no load will experience no wear when the parts were recently lubricated - as my car was when I drove it immediately beforehand.
__________________
AW/Carbonstructure 6MT 2015 M3 picked up 8/22/2014. Stripper except for adaptive suspension. Weighed at 3,450 pounds with 1/4 fuel. 70,000 miles as of February 2020.
|
|
|
Appreciate
1
|
| 02-12-2015, 09:40 PM | #9 |
|
Lieutenant Colonel

1231
Rep 1,789
Posts
Drives: wife crazy
Join Date: Jul 2014
Location: Phoenix
iTrader: (0)
Garage List 2019 Ford Raptor [0.00]
2016 Porsche 991.1 ... [0.00] 1987 Chevy Camaro I ... [0.00] 1972 Chevy Corvette [0.00] 1999 BMW M3 race car [0.00] |
Good stuff Joe, thanks.
Just a heads up, that little dome thing near the aluminum underpan is the official central front jack point so you can place a stand there.
__________________
Road course laptimes for BMW M4 2015 6MT
WHP East Track: 1:04.880, Arizona Motorsports Park: 1:54.352 Road course laptimes for Porsche 911 991.1 GTS 7MT WHP East Track: 1:02.770, Arizona Motorsports Park: 1:48.889  |
|
Appreciate
2
Xtabi1700.00 whoismorggan553.00 |
| 02-13-2015, 08:51 AM | #11 |
|
Colonel
1792
Rep 2,995
Posts |
I sought to change it at 6200 miles, or a 5k mile interval, but life is busy with a 4 month old and a 2.5 year old
I changed it at 7400 miles instead. FYI, though I feel good about changing it, I will say that the oil was much cleaner looking than most other engine oils coming out at 3k mile intervals. While you can't judge an oil based upon look, you can judge how much combustion byproduct is dissolved within the oil and this oil was pretty light colored still. This is one clean running engine thus far. |
|
Appreciate
0
|
| 02-16-2015, 03:33 AM | #12 |
|
Trued
127
Rep 231
Posts
Drives: Saab 9-3 AERO Convertible
Join Date: Aug 2014
Location: Stockholm, Sweden
iTrader: (0)
Garage List 1978 SAAB 99 TURBO ... [10.00]
1977 SAAB 99 TURBO ... [0.00] 1978 SAAB 99 TURBO 3D [8.50] 1966 SAAB 96 MonteC ... [0.00] 2004 SAAB 9-3 AERO ... [0.00] |
Name and number of suitable oil filters please!
__________________
Jörgen Trued, Stockholm Sweden
|
|
Appreciate
0
|
| 02-16-2015, 05:48 AM | #13 | |
|
Brigadier General

1343
Rep 3,342
Posts |
Quote:
It would be nice to get a running list of oils going with analysis to back it up.  I'm also thinking about running a very different type oil than the norm around here, but I'm going to reserve my comments on that for now.
__________________
2019 Ruby GT350 - Gen 5 Whipple on corn making 855RWHP.
Sold: 2018 F80 Part Deux /DCT /YMB /Full SS /CF Trim /ZCP /ZEC w/Black 666M Sold: 2015 F80 /DCT /YMB /Full SS /CF Trim /ZEC /ZLP /HK /S&TVC- 18''///M |
|
|
Appreciate
0
|
| 02-16-2015, 11:11 AM | #14 | |
|
Colonel
1792
Rep 2,995
Posts |
Quote:
The only thing oil analysis is good for is as follows: - Air filtration analysis (indicated by silicon and sodium) - Oil filtration analysis (indicated by insolubles) - Propensity of oil to maintain it's viscosity in a given engine, which IS useful but a lower or higher viscosity doesn't mean anything much. For example, Castrol 10w60 tended to degrade down to a 10w40 within 3-4k miles on almost any M engine yet still protected just fine. Most people spent most of their time running that oil when it was in reality a 10w40. - Detection of fuel dilution, which is an engine/driving issue not an oil issue. Your usual $30 oil analysis also does a terrible job accurately measuring fuel content of the oil. Just wanted to offer these words of "wisdom" for you from someone who has spent lots of money on oil analysis only to realize, as I became more and more "expert" at it, how useless it really was for my purposes.
__________________
AW/Carbonstructure 6MT 2015 M3 picked up 8/22/2014. Stripper except for adaptive suspension. Weighed at 3,450 pounds with 1/4 fuel. 70,000 miles as of February 2020.
|
|
|
Appreciate
0
|
| 02-16-2015, 04:34 PM | #15 |
|
Brigadier General
1343
Rep 3,342
Posts |
You're probably right... I could probably hit up Bob's website and wait for someone to do the work for me. lulz I'm just used to testing what comes out of the first few oil changes.
I'm looking to use a 5w40 of the Shell variety. I've used it on a number of performance cars, and it has done me well. It might freak all these OEM guys out around here, though. 
__________________
2019 Ruby GT350 - Gen 5 Whipple on corn making 855RWHP.
Sold: 2018 F80 Part Deux /DCT /YMB /Full SS /CF Trim /ZCP /ZEC w/Black 666M Sold: 2015 F80 /DCT /YMB /Full SS /CF Trim /ZEC /ZLP /HK /S&TVC- 18''///M |
|
Appreciate
0
|
| 03-30-2015, 09:13 PM | #16 |
|
Lieutenant Colonel
1032
Rep 1,997
Posts |
thanks my fellow Pennsylvanian!! looking for little ways to cut cost to help justify all the cash i spend on the car and show my wife i care
with autox/tracking possibly going on ( ") ) i'll probably change a little more frequently. ) i'll probably change a little more frequently.does the system recognize that you changed the oil and automatically reset the sensor? i was also under the impression that the oil was monitored for replacement due to condition (i.e. if you're driving hard/tracking/autocrossing it would recognize the harsher conditions and flag it for replacement...) thanks for putting the time into this, awesome! now to look for a brake fluid DIY (done it with other cars but want to find any nuances). thanks! matt
__________________
Gone but not forgotten: '09 STi // '08 335i // '02 M3 // '11 335i // '15 M3 // '16 M3 // '16 Camaro SS // '16 Audi S3 // '18 Boxster 718S // '17 Camaro SS 1LE // '16 M6 GC CP
 |
|
Appreciate
0
|
| 04-03-2015, 10:58 PM | #18 |
|
Blocked from G80/G82 for having an opinion

3497
Rep 3,729
Posts |
There is no dipstick so I don't think a mityvac would work.
BMW also uses CBS (condition based sensors) to determine your oil service intervals so Joe's observation that his oil still looked new basically confirmed it did not need to be changed. But I guess if it gives you peace of mind then I suppose it can't hurt either. |
|
Appreciate
0
|
| 01-08-2017, 05:59 PM | #19 |
|
///Multiple
2992
Rep 4,243
Posts
Drives: M4 Coupe | M3 | Z4M Roadster
Join Date: Jan 2011
Location: San Diego, CA
iTrader: (1)
Garage List 2006 BMW Z4 M Roadster [8.81]
2016 BMW M4 Coupe ( ... [10.00] 2018 BMW M3 (Euro D ... [0.00] 2011 BMW 335is Coup ... [10.00] |
I just did an interim oil change on my '16 M4 Coupe and wanted to update the original information that the OP posted.
Besides the oil filter housing cap wrench that was linked to, you can find cap wrenches that also have a square hole for a 3/8" drive. I like the one from Burger Motorsports/Burger Tuning; it can be used with a 21MM socket, standard 21mm box/open end wrench, crescent wrench, 3/8" inch drive ratchet or torque wrench:  Edit: I just received the one that I ordered and the "nut" on the tool is now 21mm, not 19mm as shown in the picture. I edited my original post and I've contacted them.) Although you have to remove the oil filter, the oil will also drain faster if you just remove the oil filler cap. As of 9/2014 BMW started using a newer, aluminum oil pan to replace the magnesium oil pan that the original M3/M4s used. The oil drain plug is also new and instead of a 8mm (not 7mm) aluminum allen bolt, it's a 17mm hex-head steel drain plug (11137535106), pretty much the same oil drain plug that BMW has used in most of its cars for years: 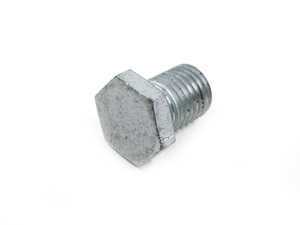 Also, instead of replacing the aluminum drain plug, the 17mm steel drain plug can be reused, but the copper crush washer still needs to be replaced at each oil change. The torque specs on both the oil filter housing cap and the steel drain plug are 25 Nm or ~18 ft./lb. BMW is all over the place with its oil recommendations. My paper manual specifies 0W-30 or alternatively 5W-30, 0W-40, or 5W-40. The PDF version of the 2016 Owner's Manual specifies 0W-40 oil or alternatively 0W-30. It also says that any oil can be used that meets the BMW Longlife-01 (LL-01) FE standard or if that isn't available, the BMW Longlife-01 (LL-01) standard. There is a stick under my hood that says 0W-30. I used the BMW 0W-40 M Twin Power Turbo oil, which is rated LL-01, but does not have the additional FE (Fuel Efficiency) rating. (Note, this oil is no longer available.)
__________________
The Coupe: 2016 M4 | Sakhir Orange | Black Full Merino Leather | CF Trim | M-DCT | More | ED 5/13/16
The Sedan: 2018 M3 | San Marino Blue | Black Full Merino Leather | CF Trim | M-DCT | ZCP | ED 7/18/18 The Roadster: 2006 Z4  | Interlagos Blue | Black Extended Nappa Leather | Carbon Leather Trim | Purchased 7/19/12 | Interlagos Blue | Black Extended Nappa Leather | Carbon Leather Trim | Purchased 7/19/12 Last edited by SD ///M4; 05-20-2021 at 07:59 PM.. |
| 01-09-2017, 06:54 PM | #20 |
|
Private
35
Rep 88
Posts
Drives: '17 AB 6MT M3 ZCP (Sabine)
Join Date: Nov 2016
Location: Atlanta (Lawrenceville area)
|
This is awesome. I was literally searching around for this in the past week. Huge help and I will reference for future oil changes...
@Mods... what do you think of a sticky DIY sub-thread with specific posts like this under it that have been vetted or confirmed by community? It would help greatly to separate from random chatter... it could help separate items out from the general conversation, allow quicker reference, and keep sticky list in "DIY and Coding" clean. Thanks Joe! |
|
Appreciate
0
|
| 04-02-2017, 05:59 PM | #21 |
|
Major General
4992
Rep 6,860
Posts |
My car is a Sept 2014 build which appears to be right on the cusp of the change in oil drain bolts. Anyone know of a way to tell for sure which one I have without getting under the car?
|
|
Appreciate
0
|
| 04-04-2017, 04:03 PM | #22 | |
|
///Multiple
2992
Rep 4,243
Posts
Drives: M4 Coupe | M3 | Z4M Roadster
Join Date: Jan 2011
Location: San Diego, CA
iTrader: (1)
Garage List 2006 BMW Z4 M Roadster [8.81]
2016 BMW M4 Coupe ( ... [10.00] 2018 BMW M3 (Euro D ... [0.00] 2011 BMW 335is Coup ... [10.00] |
Quote:
EDIT: After doing a recent oil change I came back to this thread for the torque specs. I realized that there is no "trap door" on the F8x M3/M4. I must have been thinking of my wife's previous 335is Coupe.
__________________
The Coupe: 2016 M4 | Sakhir Orange | Black Full Merino Leather | CF Trim | M-DCT | More | ED 5/13/16
The Sedan: 2018 M3 | San Marino Blue | Black Full Merino Leather | CF Trim | M-DCT | ZCP | ED 7/18/18 The Roadster: 2006 Z4 | Interlagos Blue | Black Extended Nappa Leather | Carbon Leather Trim | Purchased 7/19/12Last edited by SD ///M4; 03-04-2019 at 09:04 PM.. |
|
|
Appreciate
0
|
Post Reply |
| Bookmarks |
|
|


 2015 M3 Sakhir Orange


