

BMW 3-Series and 4-Series Forum (F30 / F32) | F30POST
>
F31 Gladen 201 + Mosconi 120.4 Install

| 11-09-2014, 05:04 PM | #1 |
|
Eh? Team member

514
Rep 1,190
Posts
Drives: F31 335i
Join Date: Sep 2014
Location: Leamington Spa
|
F31 Gladen 201 + Mosconi 120.4 Install
Hi all - I'm upgrading my F31's audio with a Gladen 201 speaker system and a Mosconi 120.4 DSP amp. I've learnt a lot from davethefish's install here:
http://f30.bimmerpost.com/forums/sho...ght=gladen+201 His car is an F30 though, so I thought I'd document what I'm doing and add a few additional notes covering differences on the touring as I go. Why? My car has the basic audio system ("poverty spec") - so just 4 main speakers in the door cards (no tweeters) and two sub-woofers under the seats. It sounds pretty terrible. There's no real definition to anything - it's muddled, lacks any bass control and unless you wind the treble up to full, it's dull, dull, dull. I'm constantly amazed how BMW can keep a straight face selling this junk. My wife's base-spec Golf is significantly better. The upgrade Gladen offer a BMW upgrade kit (201) that consists of 6 speakers - 2 sub-woofers, 2 mid range units and 2 tweeters - and a cross-over unit. The woofers and mid-ranges are drop-in replacements for the stock units (woofers under the seat and mid-ranges in the doors) and the tweeters fit the standard mounting points at the base of the mirrors. Since my car lacks tweeters though, the trim around the door ("door sails") lacks a grill for the speakers so new sails are needed. To the speaker upgrade, I'm adding a Mosconi 120.4 DSP amp. This is a 4-channel amp (although the base head unit only has 2 channels) with a DSP equalizer added. The DSP is useful since the base HU, in a vain effort to compensate for the lack of tweeters, pumps up the treble significantly; the DSP can rein that back in (although the Gladen cross-over adds some configurable attenuation of high-freq signals too, but it's fairly crude). The shopping list 1) Monster Audio BMW upgrade package 2 - consisting of the 201 speakers and the Mosconi amp plus some sound deadening foam (for the doors). http://www.monsteraudiodesign.co.uk/...one-120-4-dsp/ You'll also need all three package extras: 1a) Package extra 1 - Mosconi Quadlock 5m loom. This has male and female quadlock connections that plug between the HU and the existing loom. They carry most signals straight across but take the speaker output from the HU along the loom to the rear to feed the amp and then bring the new amp speaker outputs back so that they go into the existing speaker wiring. Neat - means that the existing speaker wiring can be used - except for the woofers - which I'm come to in a moment. 1b) Package extra 2 - Mosconi Quad Loop - needed to carry the phone and iDrive connectors across. 1c) Package extra 3 - 4 AWG cable kit - the amp can draw a lot of power so chunky power connections are needed. 2) New door sails to accommodate the tweeters. These can be purchased from BMW parts departments. The part numbers are: 51337323507 & 51337323508. 3) Tools - Aside from the usual toolbox staples like screwdrivers, hex keys and such like, you'll also need Torx T50, T40 and T25 bits and some trim removal tools. The basic plan In principle, these are the main tasks: - Install the amp in the boot area somewhere. - Run the Quadlock loom from the HU to the amp. - Replace the woofers with the Gladen ones. - Run new cables from the amp to the new woofers under the front seats. The Mosconi in 2-channel mode uses the other 2 channels to drive the woofer so there needs to be a separate connection to them from the amp. - Replace the mid-range units in the doors and add the tweeters. - Sit back and enjoy! Install amp in boot area This is the area where my install will differ from davethefish's version. I went into the install not really knowing where I'd site the amp. I started by pulling out as much of the trim in the boot area as I could. It's a relatively simple task. Most of the panels are held in using plastic push rivets. I also removed the "roundel" trim around the holes where the extended storage posts locate, and also removed the luggage tie-down lugs (requires a trim removal tool to get the plastic cover off and then a T40 Torx bit to remove the lug itself). The carpeted vertical trim pieces covering the wheel arches look like they need a lot of other trim pieces removing before they'll come free so I decided not to remove them and work around them in place. Once opened up, I considered my options. I could see three obvious routes: - Storage compartment under the main boot floor. The compartment is plenty big enough for the amp and in some ways was the obvious thing to do. I very nearly went for this, but I thought it would be nice to keep the storage and on top of that, the shape of the compartment didn't lend itself easily to making a mount. - The void underneath the storage area for the First Aid kit on the left of the vehicle. This is effectively where davethefish mounted his amp on the F30. I was very tempted to do the same. However, unlike on the saloon, the touring has some plastic trim that partially sits over the void and in order to remove this, it would require the carpeted vertical trim over the wheel arch to be removed. As mentioned above, this looked like a lot of other trim would need removing first and I didn't fancy getting into trim pulling hell. On top of that, it all looked pretty tight and I couldn't easily fiddle with the amp settings afterwards. So, I pondered a little and then came up with another idea... - Mount the amp vertically in the First Aid kit area itself. This option would need a vertical panel installing on which to screw the amp and I noticed two fixing points for other trim panels in convenient positions that I could use. So that's what I didYou can see the finished job here:  The amp is mounted onto a piece of thin MDF that is secured using the two trim fixings at the top and to the little tray that holds the first aid kit at the bottom. I mounted the amp with the buttons, jumpers and USB connections facing up. That should make it easier for subsequent tweaking. Here's a few steps on the way: The empty compartment: 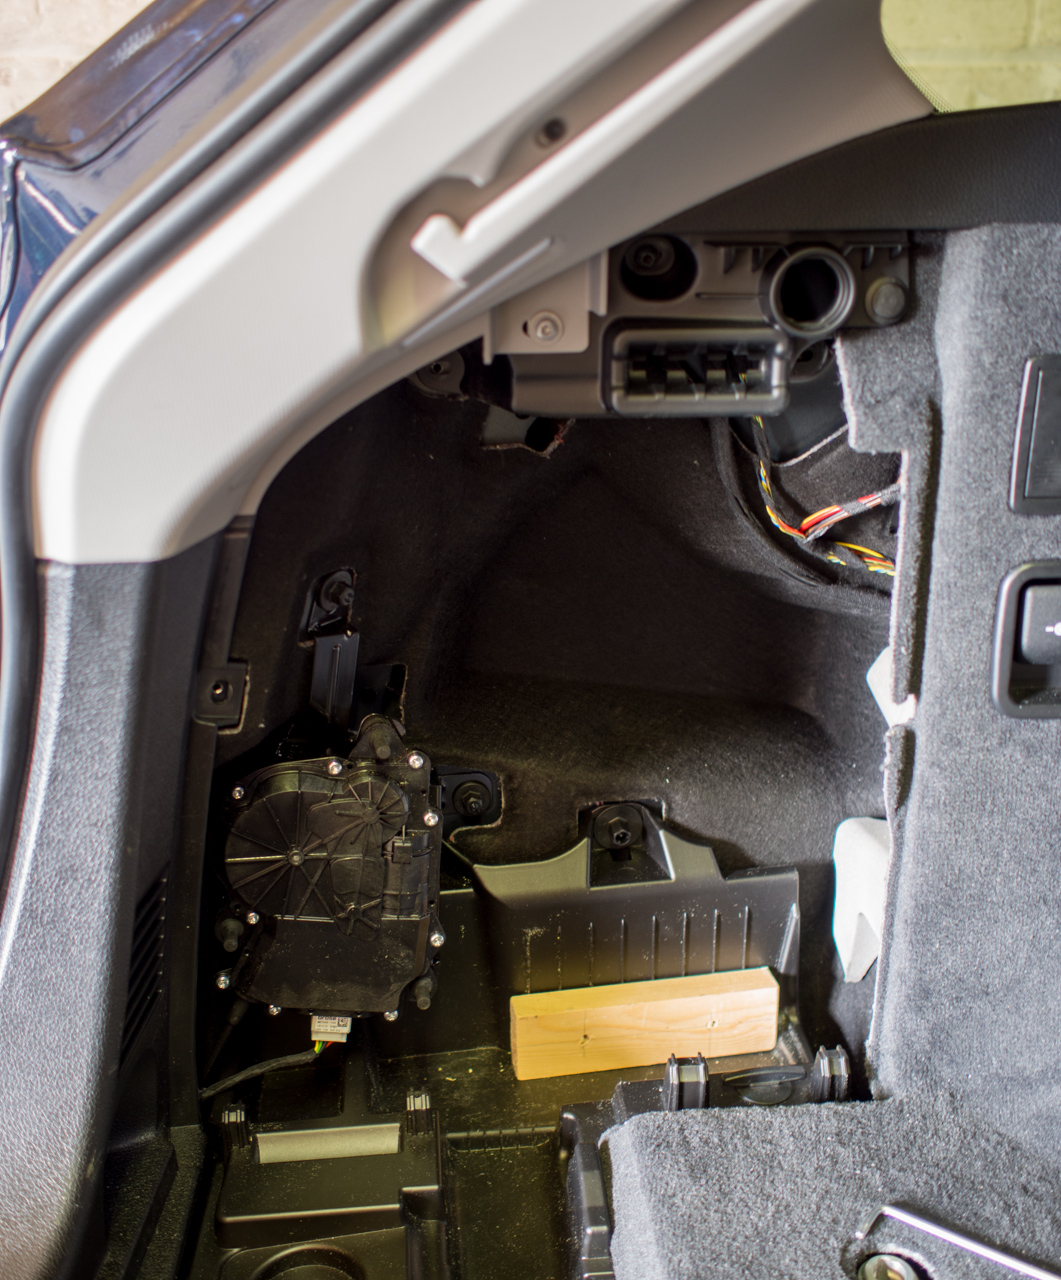 The first aid kit normally lives in the little tray at the bottom (where you can see a lump of wood!). The tray comes out fairly easily, although you need to move the boot lock mechanism (the funny black thing to the left of the tray) out of the way first. I screwed the lump of wood you can see onto the tray in order to provide a mouting point for the panel. The back of the tray has some flock glued to it to stop it rubbing onto the bodywork behind it; this made drilling a hole in it "entertaining" (think of spinning wool)! For connection of the grounding strap, I found a convenient hole in an internal metal bulkhead near the top of the compartment. I rubbed down the paint to give a good connection and then bolted the strap on. Getting a nut behind the bulkhead was tricky, but I used superglue to bond the nut to my finger which allowed me to hold it in place while I put the bolt through! 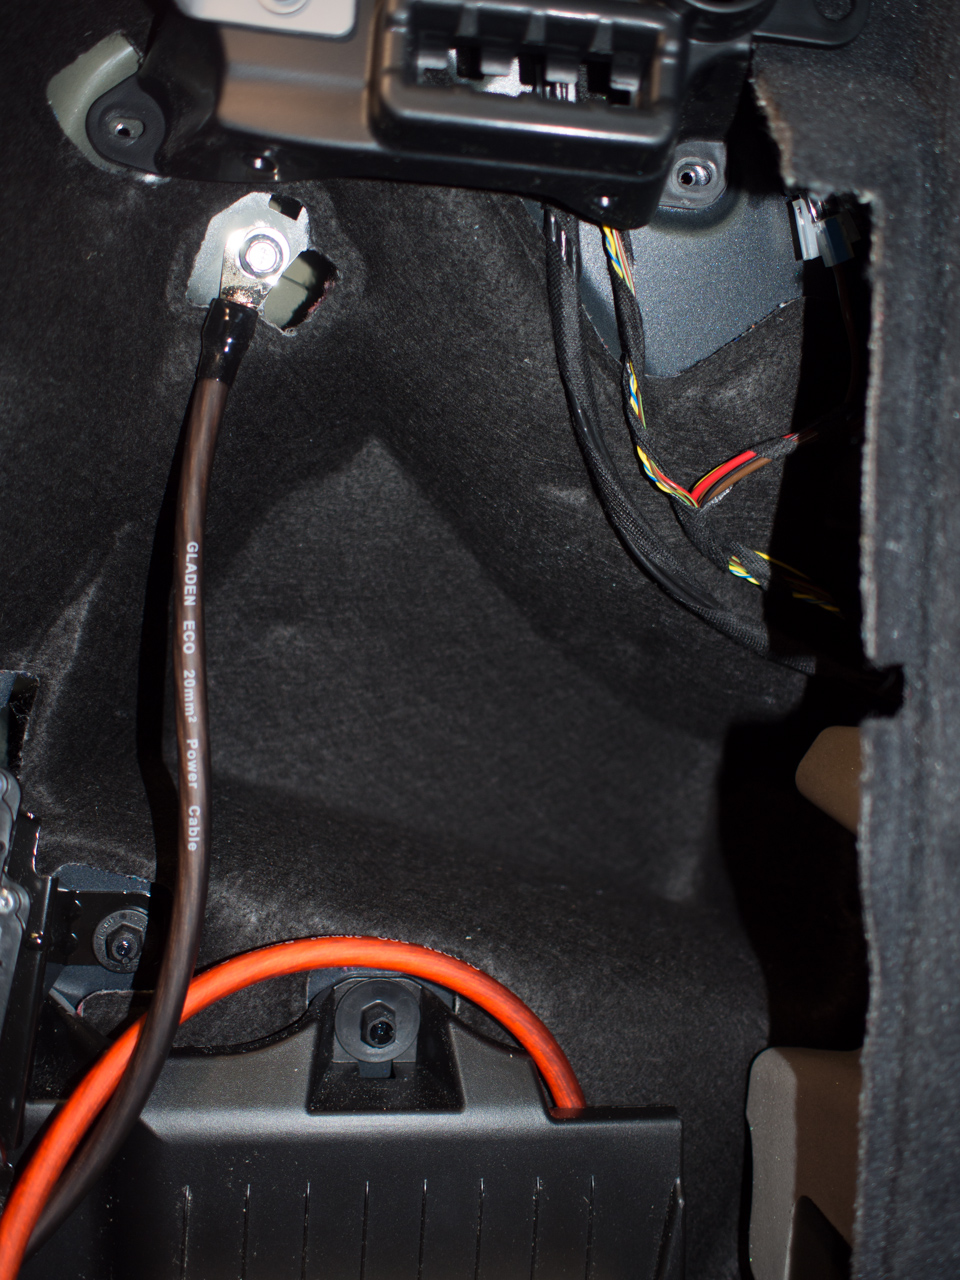 The MDF panel in place: 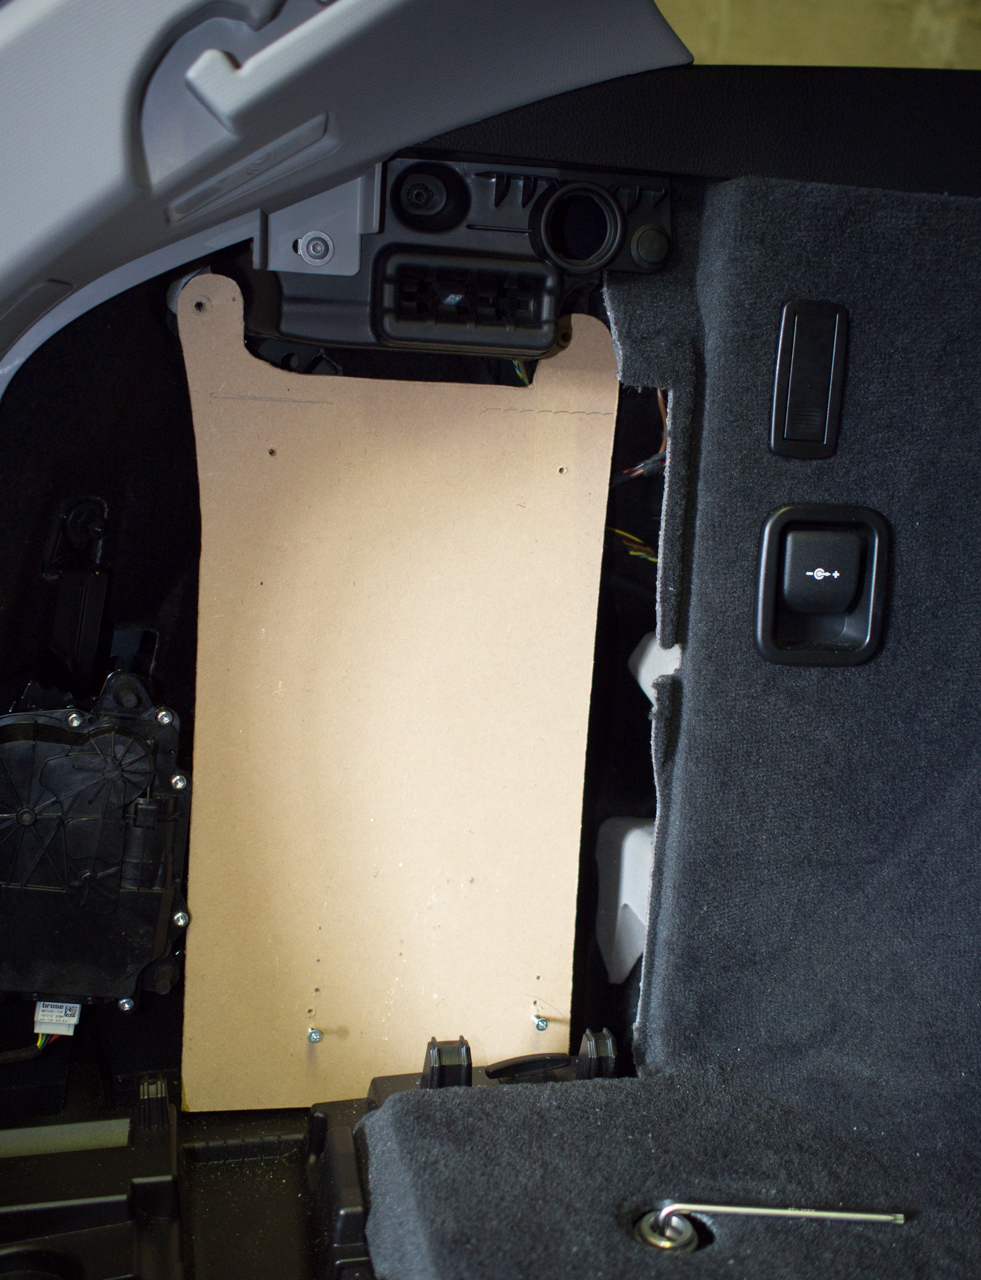 I used a piece of thin foam (but card would do) to first make a template for the MDF. Then I had to wire it to the battery. This turned out to be fairly simple. I routed the thick 4 AWG wire underneath the trim panel that sits forward of the storage compartment. This houses some electronic components (don't know what they do) but there's plenty of room for the cable. Either side of this, the cable goes underneath the carpeted trim panels over the wheel arches and then along them towards the rear of the car and into the first-aid kit compartment on the left and the battery compartment on the right.  The connection to the battery is fairly straightforward. I used the same mounting post where there is an existing connection. The in-line fuse supplied with the 4 AWG wire kit is shown in the photo below just below the battery: 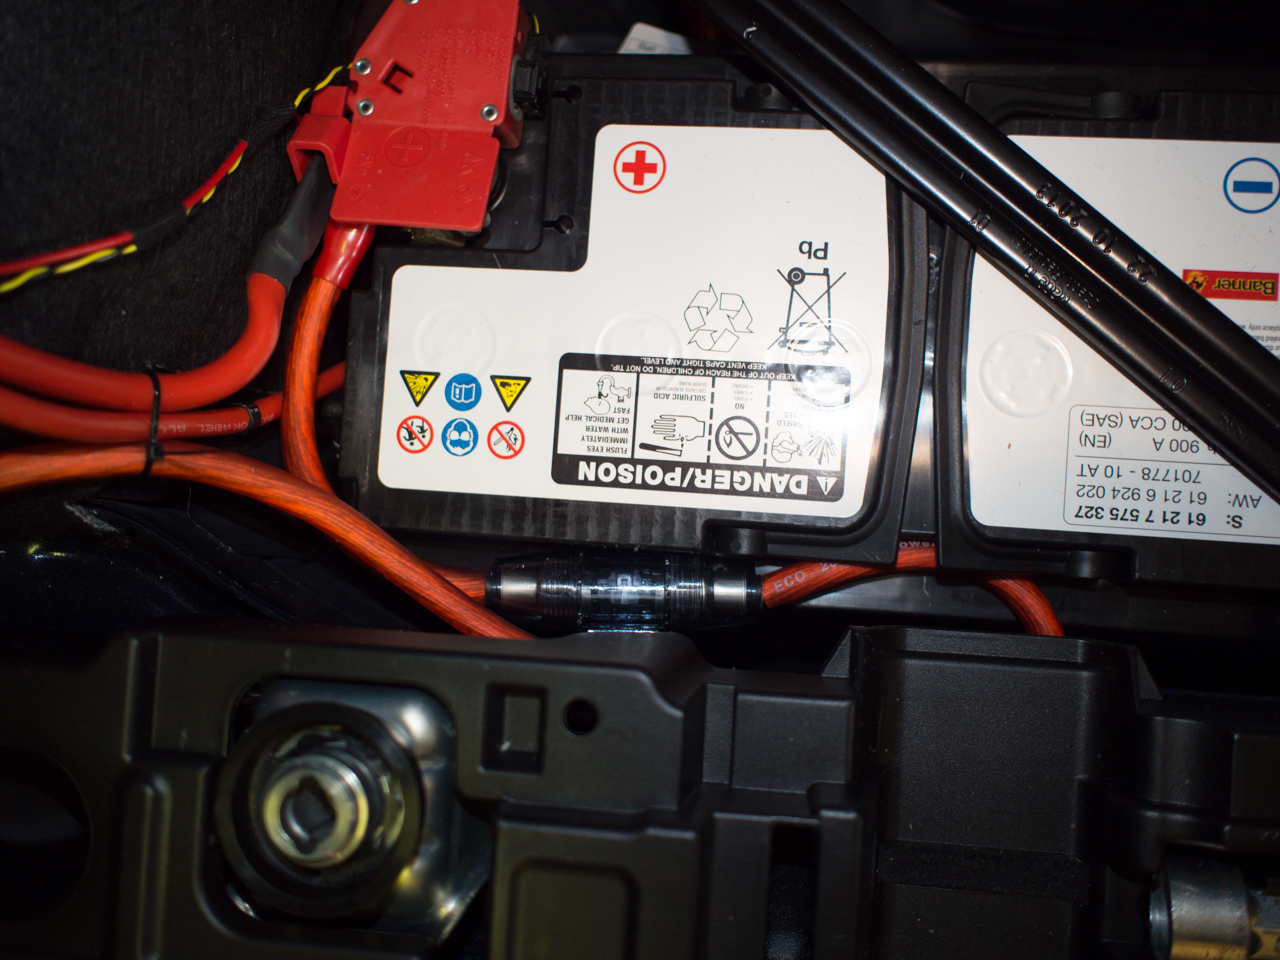 OK, so that's as far as I've got. I'll be adding more info as I go along... Last edited by pdk42; 04-20-2019 at 04:48 PM.. |
| 11-09-2014, 05:15 PM | #3 |
|
General
 
8567
Rep 19,982
Posts
Drives: 911, Cayenne Turbo, Disco 4
Join Date: Sep 2013
Location: Crieff, Perthshire, Scotland
|
Good luck! Hope it goes well.
I quite enjoyed taking my car apart in the summer to fit sound deadening and dyanmat, so hat's off to you doing this in November! Hope you've got a garage! So glad I've got the HK set up 
__________________
Current: Porsche 911 991 C4S, Porsche Cayenne Turbo, Land Rover Discovery 4. Gone...G01 X3 M40i, Cayman S 987, F31 340i, Cayman GT4, F82 M4 CP, Lotus Exige V6, G20 330e, F30 330e, Boxster S 987, F31 335d, Mini Cooper SD, E89 Z4, E90 330d 320d, E60 520d, E46 330d 320d, MX5s, E30 325i
|
|
Appreciate
0
|
| 11-10-2014, 12:32 PM | #4 |
|
Brigadier General

1517
Rep 3,560
Posts |
Nice one. More information for me :-) my kit arrived today. Exactly same as yours. I'll be putting in an F32 so I'm hoping its going to be very similar to yours and daves.
|
|
Appreciate
0
|
| 11-10-2014, 03:54 PM | #6 | |
|
Eh? Team member
514
Rep 1,190
Posts
Drives: F31 335i
Join Date: Sep 2014
Location: Leamington Spa
|
Quote:
In other news, I'm buying an old Z4 this coming Fri, so not sure whether I'll get much done on the F31 install this coming weekend - will be too busy polishing the Zed! (unless it rains...). |
|
|
Appreciate
0
|
| 11-17-2014, 12:52 PM | #7 |
|
Eh? Team member
514
Rep 1,190
Posts
Drives: F31 335i
Join Date: Sep 2014
Location: Leamington Spa
|
I finished my install this past weekend. Absolutely stunning sound quality. I was deaf and now I can hear!
Rest of install was fairly painless except for removing the old subs from their enclosures. They are glued in and need a lot of force and near wrecking to get them out.. Routing the loom to the rear required the removal of the rear seat bolsters which come off fairly easily with a tug from the top. Finally, don't forget to move the Bluetooth connector across from the original quadlock to the new one in the loom. I did, and spent a half hour trying to figure out what I'd done wrong! |
|
Appreciate
0
|
| 11-17-2014, 03:43 PM | #9 | |
|
Eh? Team member
514
Rep 1,190
Posts
Drives: F31 335i
Join Date: Sep 2014
Location: Leamington Spa
|
Quote:
|
|
|
Appreciate
0
|
| 11-17-2014, 03:45 PM | #10 | |
|
Brigadier General
1517
Rep 3,560
Posts |
Quote:
|
|
|
Appreciate
0
|
| 11-26-2014, 06:27 PM | #11 |
|
Eh? Team member
514
Rep 1,190
Posts
Drives: F31 335i
Join Date: Sep 2014
Location: Leamington Spa
|
I've had my system for a week or so now and have done some playing around to get the system set up as I'd like. I think I'm pretty close now so I thought I'd share my experiences.
Firstly, maybe it's me, but I found the 2ch/4ch channel configuration somewhat confusing (the instruction manual is truly terrible). The problem/confusion is that there are two controls - a jumper labelled "2/4-CH IN" and a MODE push-button labelled "2CH" when in and "4CH" when out. It transpires that the jumper controls how the rear inputs are handled. When the jumper is removed, it treats them as AUX inputs for nav/phone etc and will do a soft mute of the front input when it detects input on them. In this jumper configuration, the mode switch should always be set to "4CH" (although bizarrely the manual says "DO NOT USE for this configuration" implying that it's not important). When the jumper is in place, it treats the rear phono connectors either as an input (mode switch set to "4CH"), or as a bypass output (mode switch set to "2CH"). I initially set it up with the jumper removed ("4CH") and the mode button pressed in ("2CH") - since it's NOT USED, right? It all seemed to work, but when I wound the volume up, the amp would keep shutting down. I initially thought this was some overload cutout, even though it didn't seem I was driving a 4x120W amp loud enough to cause this. Eventually it dawned on me that the amp was doing a soft mute on the non-existent Nav/Phone input. Clearly with the jumper removed and mode button pressed there is some leakage of signal that trips the soft mute mechanism. I put the jumper in and bingo, the shutdowns stopped! I could then concentrate on the DSP setup. The standard "Profile 1" setup was a big improvement on the original installation, but it was still a bit "thin". So, I installed the config I got from Edd at MonsterAudio. This was a big improvement, but I still felt it lacked something. I did a bit of playing with the DSP settings myself, but there's so much to change and frankly not enough time to really evaluate the result so I did some searching on Google for any configs that others have done. I found that this post by Makkan had some nice DSP settings and I'm currently using the "MID RANGE ADJUSTED" setup which I think works really well: http://www.e90post.com/forums/showthread.php?t=929033 Anyhow - hope this post helps anyone who's doing the Mosconi/Gladen upgrade! |
|
Appreciate
0
|
| 11-27-2014, 01:57 AM | #12 |
|
Brigadier General
1517
Rep 3,560
Posts |
Thanks for the info.
I still haven't had time to even think about starting my upgrade. Everything is sat in the garage and maybe for some time :-( But when I do get around to it I maybe in touch for advice. Not done anything like this before on a car and all the amp instructions confused the hell out of me. Thanks again :-) |
|
Appreciate
0
|
| 11-27-2014, 02:25 AM | #13 |
|
Eh? Team member
514
Rep 1,190
Posts
Drives: F31 335i
Join Date: Sep 2014
Location: Leamington Spa
|
Yea, feel free to drop me a PM and I'll do all I can to help. It's actually not that difficult a job. If I had to do it again, I could probably get it done in a day.
|
|
Appreciate
0
|
| 11-27-2014, 02:33 AM | #14 | |
|
Brigadier General
1517
Rep 3,560
Posts |
Quote:
Out of interest to you cut either on the loops on the crossovers? I spoke with Ed and he said he always cuts one of them straight away. I don't remember which one. But I'd rather do it in one go rather than having to go back and take the doors apart again. |
|
|
Appreciate
0
|
| 11-27-2014, 07:30 AM | #15 |
|
Eh? Team member
514
Rep 1,190
Posts
Drives: F31 335i
Join Date: Sep 2014
Location: Leamington Spa
|
The amp setup (once you configure the jumper and mode switch correctly!) is simple. I wouldn't worry about it. I can give you precise instructions if you need it. The things that took the time for me (in rough order) were:
- Making a mount for the amp - Getting the old sub-woofers out of their enclosures (they're glued) - Mounting the crossovers - Figuring why blue-tooth didn't work after I'd put the dash back together (I didn't transfer the bluetooth antenna connection over to the new quadlock). Regarding the crossover - I didn't cut either of the wires. I figured I could compensate with the DSP if I needed to. In the event, it's not too tinny even with a relatively flat setup on the amp. Then again, I'm not as young as I used to be, so I tend to turn the treble up on HiFis etc! |
|
Appreciate
0
|
Post Reply |
| Bookmarks |
|
|


